Showing posts with label red. Show all posts

Tuesday, February 16, 2016

Valentines and Maybe a Quilling Conference

Oh dear, I'm two days late posting my valentine, but no matter, here it is!  I hope you had a happy day and a chance to spend at least a few moments with a friend or family member.

I was lucky - I got chocolates, flowers, AND that framed commemorative stamp I've been going on about.  You know exactly the one I mean, of course ...

Now in addition to these pleasant ruminations, my mind has been taken up with a few other matters.  Such as pushing forward with my current WIP, the herb sampler, as I mentioned before.

But the big thing is trying to decide if I will take some precious time and funds and go to my first ever quilling conference.  The North American Quilling Guild is having its conference in Tennessee this year, not too far from where I will be at another meeting, right beforehand.  So it would be pretty straightforward to just hop over there and see what it's like.  I'd really like to go, meet other quillers, maybe pick up some new techniques, and see what the vendors have for sale.  But I don't have many free weekends as it is these days, so I just don't know.  Are you going?  What is it like, and what draws you there?  Are there any younger quillers?  I'm always interested in meeting the next generation!  I'm also considering offering a class about sharing your quilling online.  A lot of the quillers I know are not computer-savvy, and haven't really started connecting with the online community at all.  I think it might be useful and fun to show these folks what is out there, other than Facebook, like Twitter, say, as well as DeviantArt, Craftsy, and of course blogs!  What do you think?  Would you check out such a class?

Image credits:  My pix of my quilling, also my chocolates and my own new framed commemorative quilling stamp!

Saturday, August 29, 2015

Work in Progress - Dragon, Update Two

A view of dragon from the last
update - neck filled in.
As I blogged previously, my current "large" project is a dragon. I've been working on it and then putting it off and quilling other things (iterate) for quite some time now, but it is beginning to come together. Here's another update on dragon's status.

Lower half of body with
red and blue outline on the
upper half, and orange spines.
I had filled in the neck and then used the yellow underbelly quills to help me guide filling in the first half of the body.  It was tricky, since I was stubbornly holding to the idea that I wanted all the green teardrop shapes to be the same size (more or less) and point the same way.  So getting around the curves took some planning and a bit of forming (and shoving) of the quills into place.

Then I noted that my drawing had outlines of both red and blue.  So using single strips I lined the upper side of the body.  The effect is subtle, not thick like in the line drawing, but I think it works just fine.  You can see this effect better in the second picture, where the lower half of the body is completed.

Dragon foot!  With claws!
The spines were really a pain. As in the line drawing, I wanted them to be orange with blue on the outside, just as I had colored them in.  So I glued strips of orange and blue together and started rolling.  Each of the spines is a different size, and is curved in its own unique way.  So there was no other method to follow but to keep experimenting with different lengths of strips, rolling them up and seeing if they could be made to fit any of the spines.  I started to get a feel for it after a while, and ended up making all the spines at once, and holding them aside for use as I made each body part later.

Two thirds of a dragon -
just needs three more legs
and of course a face :)
After that, the end bit of the tail was pretty straightforward, lining up green teardrop quills, and then lining the piece with blue and red.  The next tricky part was the foot.  How was I going to quill the feet?  Fill them in with tight circles?  I just didn't like the idea.  Seemed too 'heavy.'  I wanted something more lacy and more stylized.  Eventually I realized what I really wanted was something simple, and used open circles for the whole foot, and then tiny little teardrops for the claws.

Next update for dragon will hopefully show the finished piece!  I'm working just ahead of when these updates are posting, and so am pushing to have dragon all done by the end of the month.  And maybe, just maybe, dragon will be submitted to a contest ...

Image Credit:  My pix of my dragon.

Saturday, August 15, 2015

Finding Quilling in the World

Quilling design on the cover of a catalog!
I don't like sorting through the mail.  I'm not sure why, but I think it is because my mail generally consists of too many catalogs, the usual bills, and a plethora of general junk mailers.  So imagine my glee when I rifled through the mail and found this!  Quilling in the 'real' world!  (Note I'm not promoting the catalog in question, I'm just thrilled with the quilled cover!)

I absolutely love to see this.  I've been quilling for almost forty years now, and there were long, long stretches where nobody else I knew was doing it.  Nobody even knew what it was, nor had ever seen a single piece of quilling.  It was so out of vogue that I had trouble finding places to buy paper - no one was carrying it, and the companies I used as a kid were all going out of business.  The craft stores stopped carrying supplies.  It was fortunate that I had bought so much paper when I started, because it literally got me through years where I was unable to find any source at all (unless I wanted to make my own, which I was starting to consider).

Then things changed.  It was slow at first, but more companies popped up selling paper and quilling supplies.  More quilling books showed up in the bookstore.  And thank heavens for the internet.  I love the internet.  Suddenly I could find supplies in odd, niche places. And I could find other quillers.  There weren't many at the beginning of the net, but now there are so many more.
And the craft is really taking off in Russia, India, and Japan, just as it has always been around in places like the England, the Netherlands, and Australia (as far as I understand it.)  I'm so keen to see all the new ideas and techniques that come of this quilling renaissance.  Amazing pieces of work are being created all over the world. 
  
So I'm thinking seeing quilling on the cover of a catalog is a really good sign.  I think it shows the growing health of quilling as an art and a craft, as well as a new way to illustrate and design.  I hope to see more, and my eyes are always wide open and looking!

Saturday, August 8, 2015

Quilled Poinsettia Flower Ornament

As I noted in my last post, there is a need for quilled Christmas tree ornaments for a "Quilled Ornament Charity Project."  Click the link for details about the project, and to see if you might be interested in participating!

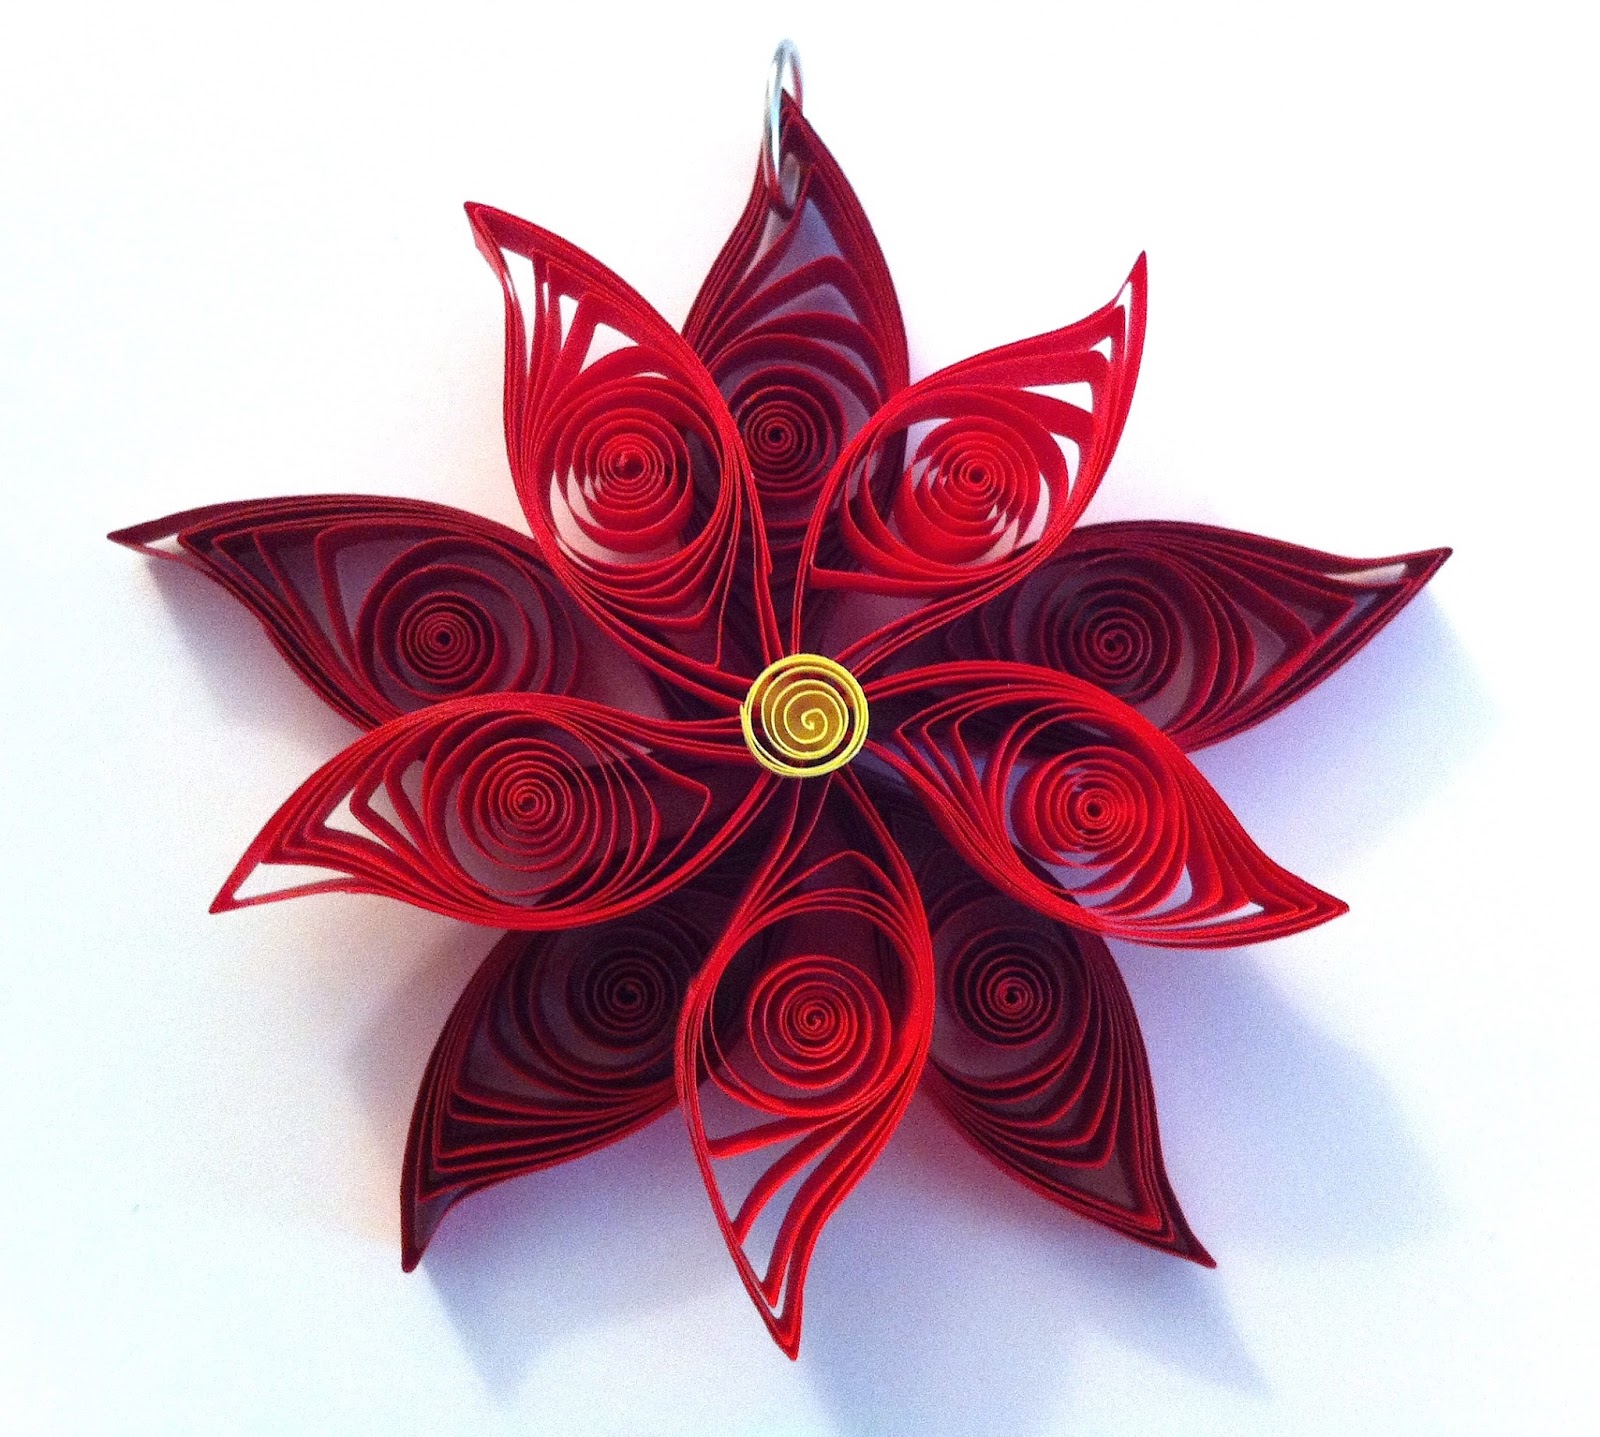
I have decided to make two ornaments for the project.  The first is this quilled poinsettia flower ornament.  It is a simple design, but it looks really lovely now that it is all finished.  I thought I'd present a tutorial here of what I did, so anyone could make one.  Although I've done plenty of live presentations and workshops, this is the first written tutorial I've really done for quilling, so here it goes.

Here's what you'll need ...
  • Five full strips of dark red quilling paper, 1/4 of an inch wide.  
  • Five full strips of light red quilling paper, also 1/4 of an inch wide.  
  • One bright yellow strip, 4 inches long and 1/8 of an inch wide.  
  • One full strip of green with gold edging, 1/8 inch wide, and another half of a strip of the same color.
  • Glue, I use a good quality white craft glue.
  • Ideally, a clear acrylic spray to finish the ornament 
Roll the dark red strips and form them into 'leaf' shapes.  Glue the ends of the petals together to form a five-petaled flower, as shown.  Roll the light red strips and also make 'leaf' shapes.  Glue these together to form another five-petaled flower.

Now, you can see my light red flower is a bit smaller than the dark red flower.  This was intentional.  My dark red paper is very heavy, making a larger coil when it unwinds, and my light red paper is light, rolling tightly and not unwinding so much.  So even though the strips are the same length, the petals for the light red flower layer are somewhat smaller.  If you are dealing with paper that is the same weight for each color, you'll want to take some of the length off of your light red strips to achieve this effect.  I've placed a quarter in the image to give a sense of scale, both so you can see the difference in sizes a little better, and so you can see the size of the whole design.  It's more than four inches across at this point.

After the two 'flowers' have dried, stack the light red, smaller layer on top of the larger dark red layer and glue them together, staggering the petals.  You might have to be clever with small dabs of glue here and there to ensure the design is sturdy enough to hang from a tree, but doesn't look like it has glue all over it.

Then roll the bright yellow strip into a simple open circle quill and glue that to the center of the design.  This was where I'd originally intended to stop.  I added a silver jump ring at the top so it could dangle from the tree.  But then I took another look and decided the piece needed a but more 'oomph.'  So I chose to put a pair of leaves on it.  Roll the two green/gold gilded strips and make leaf shapes, as shown.  One will be smaller than the other, of course, because the strips are not the same length.  You might need to be careful about gluing them.  I had to add extra glue to the backs (the not-gold side) to make sure that they didn't 'spring out' like, well, springs, anytime the design was bumped or dropped.  (I put it through a few tests ...)

Then I glued them between the bottom petals of the flower, keeping them flat on the work surface.  They added just the extra interest and 'bling' I was looking for.  Then I coated the design with about three light coats of clear acrylic sealer.  I use Krylon Gloss UV protective clear coating for most of my quilling.  I like the way it tends to enhance the colors while adding a bit of a sheen.  Excellent in this case, athough I use the 'matte' finish rather than the 'gloss' in some situations.

Finished!  It's about five inches from top to bottom, and has a nice sturdy feel to it.  I hope it shows up well on a six foot tree, and has the durability to survive the whole auctioning process :)

Image Credit - My photos of my new poinsettia flower ornament!