Showing posts with label dragon. Show all posts

Wednesday, September 2, 2015

Work in Progress - Dragon, Update Three, Final!

My dragon is finished (as of August 27th)!  I was able to get him matted and framed under glass.  It took a decent shadow-box style frame, (10"x10" with an inch of clearance) since the dragon is about 3/4" of an inch thick.

Dragon has been entered in a CONTEST!  Please VOTE for him!  He is project #14 on facebook at Little Circles at https://www.facebook.com/LittleCirclesEverywhere  All you need to do to vote is to 'like' the dragon.  Voting only goes on for a few days, September 2-4, 2015 so please skip on over there soon!  Check out the competition, it's pretty fierce.  Some beautiful pieces of quilling!  If dragon gets enough votes to get into the top ten, he goes on to the next round of judging!

Gorgeous dragon face!
So, since the last update, I finished up the three missing legs, and then started on what I knew was going to be the hardest part - the face.  I spent a lot of time planning out exactly how I was going to make each quill for the eyes, nose, teeth, and then the embellishments like the crown of 'fire' and the whiskers.

It was in the face and crown that I strayed the furthest from my colored line art.  The crown is formed from layered curls instead of wisps of colored paper.  I liked this look better - it was lacy and seemed more substantial than what the line art might have called for.  Also the eye and the area around it should have had some blue and green, but I chose to keep the color scheme consistent with orange, so it would grade nicely into the 'fire.'
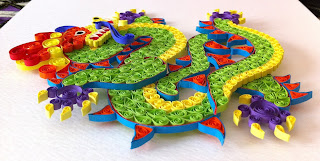
Side shot of dragon, showing his dimensional nature
The body, face, and tail are all on different levels
and so dragon is almost 3/4 of an inch thick.
I made about two dozen teeth trying to get the exact shapes and sizes that I wanted to fit nicely into the mouth.  The whiskers took an hour on their own, as I searched for just the perfect shade color, and experimented with different techniques for the shapes.  I made several eyes of different shapes, as well.  Some made my dragon look like he'd had too much coffee!  The final choice has him looking forward, and he seems much less startled :)

Then, with all the pieces in hand, I finished them up with spray and proceeded to glue them together.  This step also took a long time, since this dragon is very dimensional.  It is assembled in four different levels.  I had to place pegs onto the back of some of the levels to support them, with a few pegs doubled up to give them enough height.  Then I glued the lower half of the body to the top, and he was finished!

And now he is to be shipped off to his forever home!  It is always bitter-sweet to say goodbye to a project, since I get so attached to them.  But as usual, when I have in mind to give a project away, it never feels right until that person has received the gift.  Then ... well ... next project!

Image Credit:  My pix of my dragon!

Saturday, August 29, 2015

Work in Progress - Dragon, Update Two

A view of dragon from the last
update - neck filled in.
As I blogged previously, my current "large" project is a dragon. I've been working on it and then putting it off and quilling other things (iterate) for quite some time now, but it is beginning to come together. Here's another update on dragon's status.

Lower half of body with
red and blue outline on the
upper half, and orange spines.
I had filled in the neck and then used the yellow underbelly quills to help me guide filling in the first half of the body.  It was tricky, since I was stubbornly holding to the idea that I wanted all the green teardrop shapes to be the same size (more or less) and point the same way.  So getting around the curves took some planning and a bit of forming (and shoving) of the quills into place.

Then I noted that my drawing had outlines of both red and blue.  So using single strips I lined the upper side of the body.  The effect is subtle, not thick like in the line drawing, but I think it works just fine.  You can see this effect better in the second picture, where the lower half of the body is completed.

Dragon foot!  With claws!
The spines were really a pain. As in the line drawing, I wanted them to be orange with blue on the outside, just as I had colored them in.  So I glued strips of orange and blue together and started rolling.  Each of the spines is a different size, and is curved in its own unique way.  So there was no other method to follow but to keep experimenting with different lengths of strips, rolling them up and seeing if they could be made to fit any of the spines.  I started to get a feel for it after a while, and ended up making all the spines at once, and holding them aside for use as I made each body part later.

Two thirds of a dragon -
just needs three more legs
and of course a face :)
After that, the end bit of the tail was pretty straightforward, lining up green teardrop quills, and then lining the piece with blue and red.  The next tricky part was the foot.  How was I going to quill the feet?  Fill them in with tight circles?  I just didn't like the idea.  Seemed too 'heavy.'  I wanted something more lacy and more stylized.  Eventually I realized what I really wanted was something simple, and used open circles for the whole foot, and then tiny little teardrops for the claws.

Next update for dragon will hopefully show the finished piece!  I'm working just ahead of when these updates are posting, and so am pushing to have dragon all done by the end of the month.  And maybe, just maybe, dragon will be submitted to a contest ...

Image Credit:  My pix of my dragon.

Saturday, August 22, 2015

Work In Progress - Dragon, Update One

My favorite wood handle
quilling tool and a few pieces
of the latest project.
I'm always in the middle of some relatively big quilling project.  It's usually something I'm creating for a gift, and so I want to do something really nice.  So I'll start the project, but will still quill other, smaller things when I need a change of pace, (or just a break from doing the same color over and over if filling in a large space.)

Pick a nice permission-free
book of designs.
At the moment, my 'big project' work in progress (WIP) is a dragon.  I've been wanting to quill a dragon for a long, long time, but didn't find any patterns.  I finally realized I was going to have to get clever, and find a drawing of a dragon both that I liked, and that could be expressed well with quilling.

As I've mentioned in previous posts, design and motif books are a great source of ideas.  I bought a motif book about dragons that was specifically permission-free, so I could do as I liked with the design and the finished product.  I spent a long while flipping through the book and trying to make a decision.  My friend likes designs with Asian elements, so I chose to narrow the search to Asian dragons.  And then I spotted a good one.  It was too small for what I wanted, but my copier cured that by expanding the image several hundred percent.

Dragon colored in with pencils.
Size of the dragon can be seen
using my grid, four
squares to the inch.
With my pattern in hand, the next issue was color.  I made several copies of my pattern, and then used my colored pencils to try different color schemes.  It didn't take me long to hit on one I really liked, with a neon/lime green for the body, yellow for the underbelly and face, and then a host of other colors like orange and blue for the spines, and purple for the claws.

I was pleased with the result, and figured that this had some great elements to express in quilling.  The only concern I had (and have) is the face.  Haven't gotten that far (yet).  Note that an arm and a leg are behind the main body, and that the tail is also flipped up to be up above part of the body and the lower part of the tail.  I wanted to quill this difference - make the dragon dimensional.  So I had to plan ahead which pieces needed to be quilled and then glued in what order.

Then came the fun part of just experimenting.  I didn't know what size paper I needed, so simply dug through the huge box of spare paper (that I'm sure every quiller has) found some stuff I had a lot of, and used that to figure out what size paper I was going to need to get a given size shape.  I figured the scales would be best expressed with teardrop shapes, and the underbelly, well, I just started following the lines.  As soon as I knew I had a good, repeatable size and form, I switched to the bright green (that I don't have a ton of) and the bright yellow, and started quilling away.  I immediately liked the effect, and was encouraged!  I'm always worried when I start a big project - will it "work" or just not look right.  I'm pretty sure the body of the dragon, at least is going to look just fine.

Image Credit:  My pix of my quilling, and a line art from the book Dragons - A Book of Designs, by Marty Noble.  Dragon line drawing is specifically free for use.  BUT my quilled version of the dragon is my own design, and I hold the copyright for that.