Showing posts with label ornaments. Show all posts

Saturday, February 20, 2016

Contests or Collaborations in Quilling

The NAQG Winter
Newsletter with Quilling
covered tree!
I found the winter edition of Quill America (the newsletter of the North American Quilling Guild) in my mailbox yesterday.  I was happy to see that the highlighted project on the front cover was "Festival of Trees:  Quilling Around the World."  This was the project that I had contributed to in October last year.  On the cover you can see the fully decorated tree, decked out with quilling.  And you can see close-ups of the tree-topper, a lacy angel in white.  I'm very proud to have contributed to such a beautiful tree.

And more fun was to be had upon opening up the newsletter.  Turns out the organizer took the time to photograph and catalog everyone's contributions!  I was surprised to find my own quilling right there in the newsletter :)  Warm fuzzies!  I felt my work was very appreciated.  I hope the tree raised a nice sum for the charity.  This was a very fun project, and I certainly enjoyed being a part of a larger creation like this, and for a good cause.
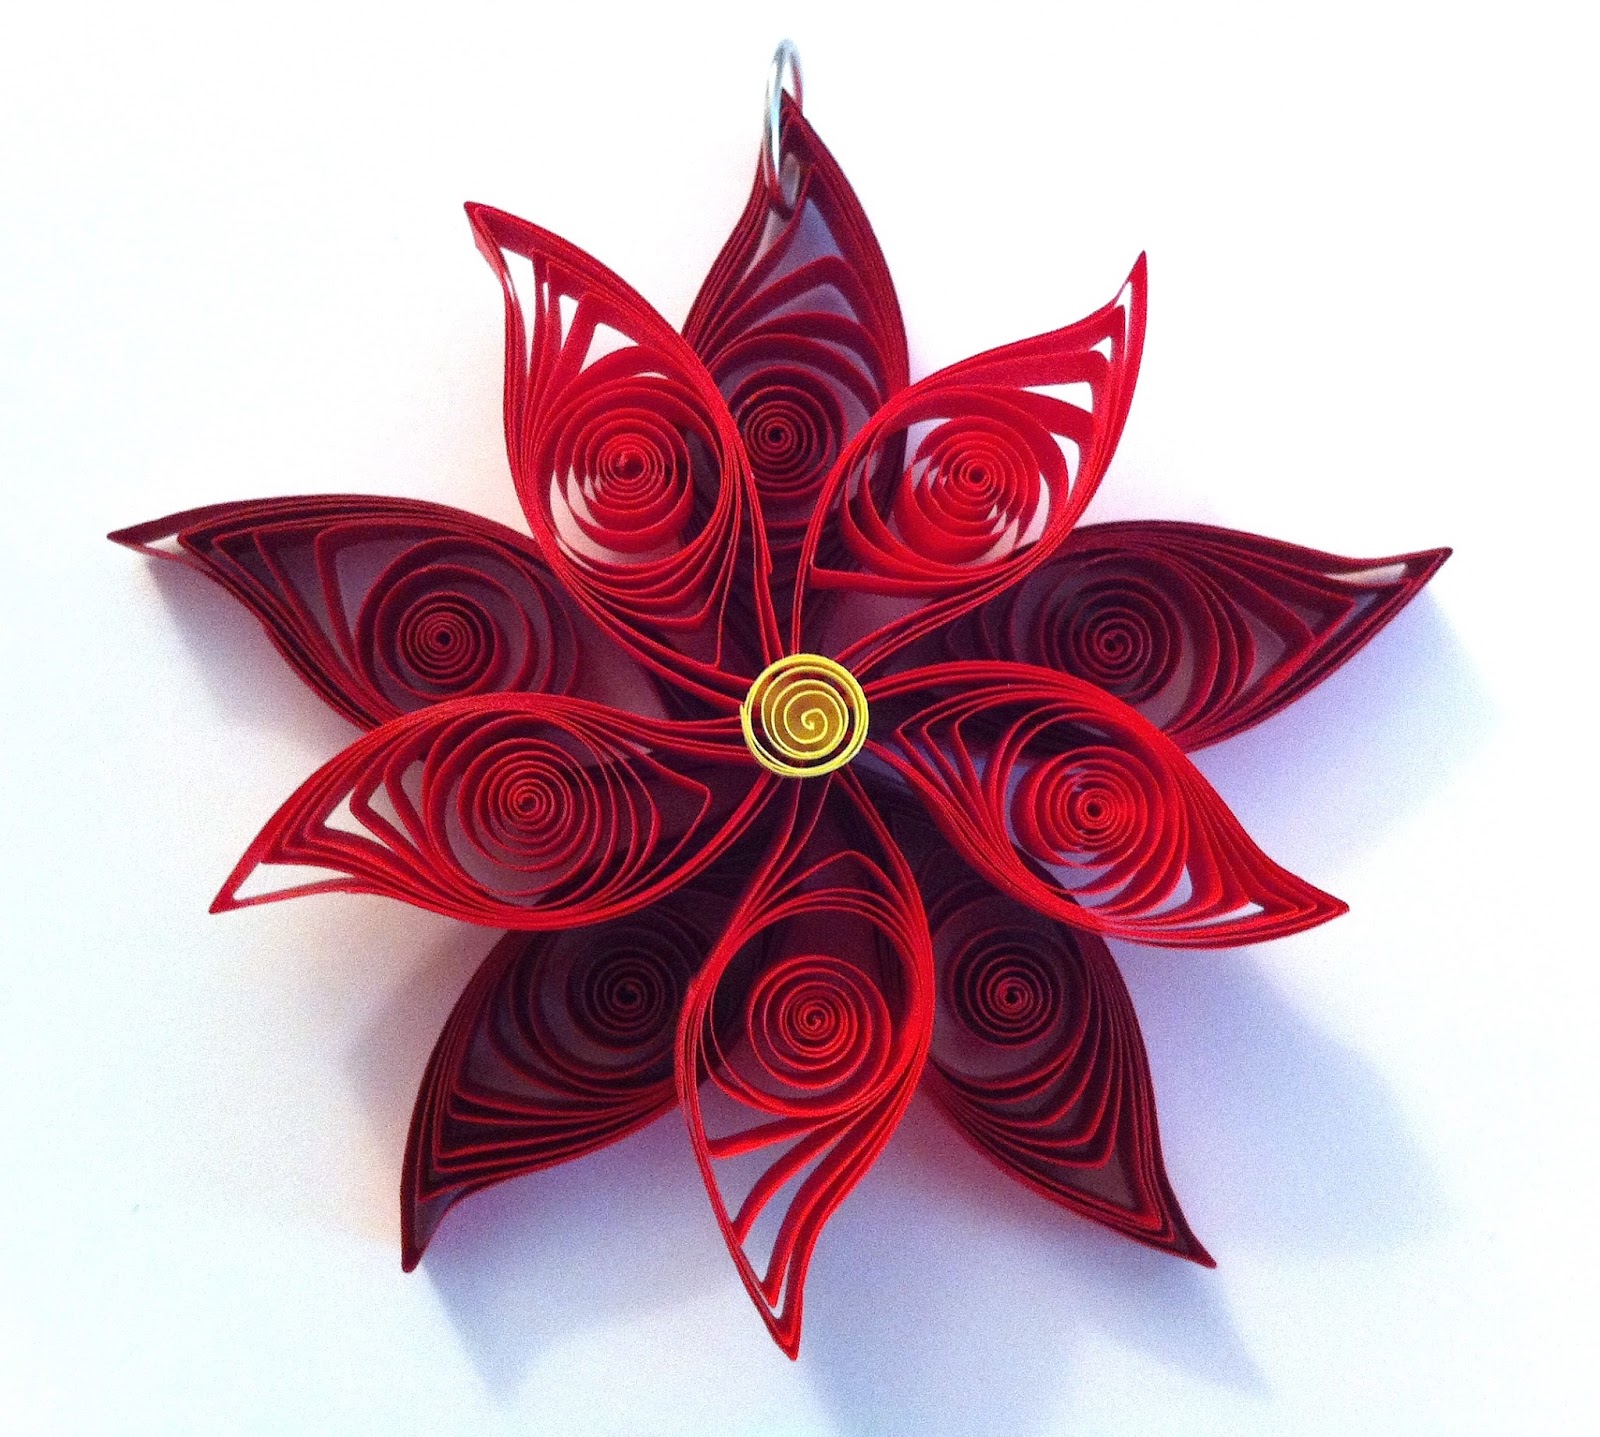
There are my ornaments in the circle!
It was so nice that the organizer took this
time to highlight all of our contributions!

This makes me think a great deal about contests versus collaborations.  None of us has infinite time to spend on quilling and so has to strategize what they will do with that time, and what they won't.  I much, much prefer to get involved with collaborative projects like this one.  I enjoy the feeling of all working together to a common cause, and the sense of community that engenders. 

Now, I have certainly entered quilling contests, and will no doubt do so again in the future.  But I do it mostly because that seems to be the go-to way for us to share our quilling with one another.  But I don't prefer it - quilling is already such a solo endeavor, it seems to be more enjoyable to me when more people are involved.  I also think it makes for a stronger sense of community.  I like seeing other people's quilling, but it does not have to be a contest for me to want to do that.

I'd really love to see more emphasis placed on community/collaborative work, and less on contests.  I'd like to see us move towards a model where we focus on these group projects and build strong community connections.  Winning a contest can be fun, no doubt.  But it just seems like there is too much importance placed on the contests.  What do you think?

Image Credits:  My pix of my own NAQG Newsletter

Saturday, September 26, 2015

Poinsettia Flower Ornament Revisited

As you know I posted the directions for my Poinsettia Flower Ornament here on the blog a few weeks ago.  (I had also created directions for my Halloween Sampler, and posted that up at Craftsy for a fee.)  It occurred to me that the directions for the simple poinsettia flower might be a nice thing to post for free, so that's what I did.

I am astonished to say that the Poinsettia Flower Instructions have been downloaded from Craftsy more than a hundred times already!  This means a couple of things to me - people really like free patterns (of course) but also, that there is a demand for really simple quilling patterns.  I am surprised, actually, but it has been ages since I was a beginner at quilling.  I'm having a little trouble imagining what it is like ... especially since there was no internet nor computers when I first started.  I learned all my material from books or from patterns I purchased.

These days, of course people are turning to the internet before anything else.  Why buy a potentially expensive book when you can download patterns for free, and get all your instructions on free videos from various sites?  Seems like a smart way to start and see if you like a craft before making more of an investment in time and money.

So I'll be thinking of ways to post other, small, free patterns and hope they are as useful and popular as the poinsettia!  I wish I had written down the directions for my candy cane when I made it.  I'll have to be more thorough when I make new pieces - someone else might want to make them, too!

Thursday, September 10, 2015

Quilled Halloween Sampler

I've been considering making a sampler of quilled Halloween projects for a long time.  I love Halloween, and often use small designs and motifs on place cards, tags, ornaments, wall art, and more.  I've never bothered to actually write down any of my designs before - so they come out differently every year, AND I have to spend extra time and paper trying to figure out what I did the last time around :)

So this year I spent the time and effort to record all my paper widths, lengths, and shapes as I worked.  I also took a few pictures of the intermediate stages as I went along.  I realized when I was close to finished that I might not be the only person who would like to use the directions.  So to make up some of the resources I used, and to cover some of the time (it took a loooong time to write this up), I decided to post all the instructions for a fee over at Craftsy.  So if you are in immediate need of some ideas for Halloween, look no further!  You can download all 16 pages of Halloween packed PDF for $3.99.

OR if you can wait, and don't have the extra $$, then keep your eyes here on the blog.  I'm going to post all the instructions in pieces right here between now and Halloween!

Here's the blurb from over at Craftsy:

The Quilled Halloween Sampler Instructions will tell you how to make nine different small Halloween themed projects (plus a bonus project!). The 16 pages are packed with pictures and ample details of paper quilling for you to recreate the sampler, or use it to come up with your own scary ideas!

These spooky designs can be used together to form a framed Halloween sampler group, or they can be used separately on greeting cards, gift tags, place settings, ornaments, wall art, or in whatever way suits your fancy! You can be creative and detour from the exact directions whenever it suits you and your project needs.

Some of the projects are very quick, while others are a little more involved, so you can fit the projects to the time you have available. Most of the designs are suitable for someone who knows the basics of paper quilling (beginner), while a few others are suitable for an intermediate level of quiller.

Most of the designs and motifs will be familiar, like bats and pumpkins, while others will be more unusual, like vampire fangs and skeleton keys. Let your creepy side out and enjoy some Halloween fun with the Quilled Halloween Sampler!

Monday, September 7, 2015

Book Review: Quilled Borders and Motifs

Quilled Borders & Motifs by Judy Cardinal.  Published by Search Press, 2008.  48 pages.

I rate it ... good!

3.2/5.0

See my post about book reviews for details about my review criteria and biases.

This is a sturdy little (48 page) quilling book that introduces a host of small designs in many themes (i.e. baby, wedding, holiday) for use in a variety of situations (i.e. cards, frames, ornaments).  I do not have a long review for this book - regrettably, as I'll note later, the publisher made a bad decision in reproducing much of the content within another book.

What I liked:
The huge variety of little projects and designs that can be used alone or together to make wall art, greeting cards, frames for invitations and announcements, and so much more.  I think this would be a good book to show to children to get their ideas flowing.

What I liked less:
As noted, the publisher made a bad decision (in my opinion) and included ALL of the motif section inside of another book (Beautiful Quilling Step-By-Step, which I'll review another time.  It has material from several books, in fact.)  This decision by Search Press makes me nervous when looking at any of their books.  I have to ask myself, "Do I already own this in another form?".  The work is reprinted exactly, page for page, materially damaging the usefulness of both books.  It's a shame since it robs each book of originality and usefulness.  Another issue with the book is the uncertain quality of the quilling - for example, the quilled heart within the tutorial on page 14 shows uneven tension (visible in several of the projects in the book, as well.)  The book has few actual patterns for the designs, making more difficult for beginners, and a bit less intuitive, I think.

As a collector of quilling books, I am happy to have it in my collection.  But for the current going price of $10 or so, I'd probably go for the larger Beautiful Quilling book instead of this one, were I choosing between the two.

Saturday, September 5, 2015

Quilled Holiday Ornaments for the Charity Project

In the end I quilled three ornaments for the "Quilled Ornament Charity Project" (even though when I made the poinsettia, I said I'd only make two).  I knew from the beginning that I didn't want to make snowflakes, since I am assuming Carie is going to get sent a ton of snowflakes.  So I concentrated on other designs that I thought would look good in a green tree.

The candy cane idea came to me as I was considering how I could use white paper for something other than snow.  I made the entire candy cane out of white, and then for the stripes, I just wound one long red strip around the piece and glued the ends down.  To add some interest, I embellished with a sprig of holly.  The star is made only from triangles, circles and eye shapes in white and yellow.  Hopefully it doesn't look too much like a snowflake :)  I didn't want to make it solid yellow, though, since I thought that would been a little boring to look at ...

So off they go to their new home, to be placed on a tree and auctioned off for charity.  Remember that the deadline for ornaments is October 15!  There is still plenty of time to quill a piece or two and send it off.  Shipping is cheap because they hardly weigh anything at all :)

Image Credit:  My pic of my own ornaments.  Designed by me.

Monday, August 24, 2015

Book Review: The Book of Paper Quilling

The Book of Paper Quilling - Techniques and Projects for Paper Filigree by Melinda Johnston.  Published by the Sterling Publishing Company, 1994.  144 pages.

I rate it ... excellent!

4.9 / 5.0

See my post about book reviews for details about my review criteria and biases.

Next to the last book I reviewed (Paper Art for Everyone) this is probably my favorite.  Or at least one of my favorites :)  It is one of the first of what I'd consider to be the "modern" breed of quilling books.  I have in my mind this idea that the "traditional" quilling books/kits/patterns were published in the 70's and 80's, and the "modern" quilling books generally in the 90's until today.  And there are other quilling books that I consider sort of "post-modern."  I call these "innovative."  These offer really new looks at techniques and projects (like typography, illustration, cross-cultural, and impressionistic work). 

Anyway, with that in mind, this is an excellent modern quilling book.

The book begins with a brief history of quilling, and then moves into the introductory/tutorial section.  The bulk of the subsequent pages are spent on projects and patterns, followed up by a gallery of wonderful quilled pieces.  Really, this is sort of my ideal outline for a "working" quilling book.

What I like:
First of all, the quality of the quilling the book is invariably high.  All the pieces are uniform, created with even tension and have a nice, even, lacy quality.  There are very small, regular center holes to each of the pieces.  The history section is accompanied by images of period quilling pieces, and the accompanying text includes several references, although more would have been welcome.  The "getting started" section is very well constructed, including showing how different paper widths effect the finished quill.  The "menu" of quilled shapes is comprehensive, and high quality.  Techniques include looping, husking, and weaving.  The bulk of the book, as noted, is filled with interesting patterns, each with detailed instructions.  Patterns include: wall art, wreaths, miniatures, ornaments, eggs, borders, gift tags, cards, magnets, coasters, baskets, jewelry, hats, and an incredible chess board with pieces.  At the end there are even simple motifs for kids to quill.  The gallery includes abstract quill art, as well as impressive, more traditional pieces.

What I like less:
Honestly, just the history section.  It needs a touch more of a scholarly approach with more citations and references for information.  That's it, really.

So if you like quilling, this is a must have, as far as I'm concerned.  And if you don't have it yet, you can get it used for less than $3.  With 144 pages of great quilling, it's a total steal.

Sunday, August 16, 2015

The Quilling Archive - A Gallery of Quilling

Quilling inside of real seashells - made into ornaments.
I've done so much quilling - it's hard to keep track of who I gave it to, and where it is even in my own home.  But I've recently been struck with the idea that I want to document it all, so I've been rounding up quilling projects, old and new, and taking the best pictures I can.  I've been putting up the best of them at my newly created DeviantArt Gallery for quilling.

There is so much stuff - wall art, ornaments, miniatures, jewelry, and more.  You can see the evolution of my quilling through much of it, but since I started at the age of nine, by the time I was in high school I was pretty proficient.  Pieces like these shell ornaments, done when I was about fourteen, show solid technique and an eye for fun.  They even include tiny little pine cones.  I don't think I'd even imagine filling seashells and turning them into ornaments anymore, which is a shame.  :)   I don't even recall where I got the idea in the first place.

They are a bit beat up, with a few pieces missing, and a touch faded.  But not much, considering decades of sunlight, humidity, and moving from place to place.  I'll chalk that up to using a good acrylic sealant, and maybe using a bit too much glue.  I've always used a bit too much glue - one of those technique problems I have ...

How about you?  What was your first quilling project?  How do you preserve your quilling for the ages?

Image Credit - My picture of my own quilling, designed by me.

Saturday, August 8, 2015

Quilled Poinsettia Flower Ornament

As I noted in my last post, there is a need for quilled Christmas tree ornaments for a "Quilled Ornament Charity Project."  Click the link for details about the project, and to see if you might be interested in participating!

I have decided to make two ornaments for the project.  The first is this quilled poinsettia flower ornament.  It is a simple design, but it looks really lovely now that it is all finished.  I thought I'd present a tutorial here of what I did, so anyone could make one.  Although I've done plenty of live presentations and workshops, this is the first written tutorial I've really done for quilling, so here it goes.

Here's what you'll need ...
  • Five full strips of dark red quilling paper, 1/4 of an inch wide.  
  • Five full strips of light red quilling paper, also 1/4 of an inch wide.  
  • One bright yellow strip, 4 inches long and 1/8 of an inch wide.  
  • One full strip of green with gold edging, 1/8 inch wide, and another half of a strip of the same color.
  • Glue, I use a good quality white craft glue.
  • Ideally, a clear acrylic spray to finish the ornament 
Roll the dark red strips and form them into 'leaf' shapes.  Glue the ends of the petals together to form a five-petaled flower, as shown.  Roll the light red strips and also make 'leaf' shapes.  Glue these together to form another five-petaled flower.

Now, you can see my light red flower is a bit smaller than the dark red flower.  This was intentional.  My dark red paper is very heavy, making a larger coil when it unwinds, and my light red paper is light, rolling tightly and not unwinding so much.  So even though the strips are the same length, the petals for the light red flower layer are somewhat smaller.  If you are dealing with paper that is the same weight for each color, you'll want to take some of the length off of your light red strips to achieve this effect.  I've placed a quarter in the image to give a sense of scale, both so you can see the difference in sizes a little better, and so you can see the size of the whole design.  It's more than four inches across at this point.

After the two 'flowers' have dried, stack the light red, smaller layer on top of the larger dark red layer and glue them together, staggering the petals.  You might have to be clever with small dabs of glue here and there to ensure the design is sturdy enough to hang from a tree, but doesn't look like it has glue all over it.

Then roll the bright yellow strip into a simple open circle quill and glue that to the center of the design.  This was where I'd originally intended to stop.  I added a silver jump ring at the top so it could dangle from the tree.  But then I took another look and decided the piece needed a but more 'oomph.'  So I chose to put a pair of leaves on it.  Roll the two green/gold gilded strips and make leaf shapes, as shown.  One will be smaller than the other, of course, because the strips are not the same length.  You might need to be careful about gluing them.  I had to add extra glue to the backs (the not-gold side) to make sure that they didn't 'spring out' like, well, springs, anytime the design was bumped or dropped.  (I put it through a few tests ...)

Then I glued them between the bottom petals of the flower, keeping them flat on the work surface.  They added just the extra interest and 'bling' I was looking for.  Then I coated the design with about three light coats of clear acrylic sealer.  I use Krylon Gloss UV protective clear coating for most of my quilling.  I like the way it tends to enhance the colors while adding a bit of a sheen.  Excellent in this case, athough I use the 'matte' finish rather than the 'gloss' in some situations.

Finished!  It's about five inches from top to bottom, and has a nice sturdy feel to it.  I hope it shows up well on a six foot tree, and has the durability to survive the whole auctioning process :)

Image Credit - My photos of my new poinsettia flower ornament!

Help with the Quilled Ornament Charity Project!

Carie Metcalf of Washington state is working on a quilling project for charity, and needs a bit of help from all the quillers she can reach.  She is creating a decorated Christmas tree for her local "Festival of Trees" with the theme "Quilling Around the World."  She needs 250 quilled ornaments of any kind, from everywhere, to put on the tree by October 15, 2015.  After the six-foot-tall tree is fully decorated, it will be auctioned off to support a hospital charity.

She particularly needs help from international quillers, but will gratefully accept a quilled ornament from anywhere.  For details on what she needs, and where and how to prepare and mail your quilling, email Carie at Carecat26 (at) gmail.com.  If you are a member of the North American Quilling Guild, you can also find details inside the Spring 2015 issue.

If you'd like to help out, but have never quilled before, you can check out this tutorial at Instructables.com, which shows how to make a simple quilled snowflake.  It even includes how to cut up a sheet of paper if you don't have access to special quilling paper!  Give it a try, and you may find you really love to quill, just like the rest of us :)  I'm also going to post the instructions for my own quilled Poinsettia Ornament that I will be sending to Carie, so keep your eyes open for that.

Image Credit:  Quilling Snowflake Decorations at Instructables.com