Showing posts with label projects. Show all posts

Friday, September 16, 2016

Quilling the Moon: Highlands and Maria

Moon - over half completed!
Highlands regions carefully
constructed to be filled in
later with 'mare' material.
As I mentioned in my first "Quilling the Moon" post, the highlands are the bright, mountainous areas of the Moon, while the mare regions (maria, plural) are the dark, flat, volcanic plains of the Moon.  I also mentioned along the way that since the mare were being filled in with nearly black paper, I needed daylight to do that work.  So I ended up working nights on the light highlands and leaving holes behind to be filled up with dark paper during the day.  It was an interesting way to approach the project, since I had to be constantly planning several steps ahead as to how the regions would look once they were completed.

Moon - Maria filled in!
Again, the color choice was really critical, and took a great deal of time.  I wanted to be sure the smaller, bright craters were consistently marked with the bright white paper, and that the intermediate areas were marked with the darker grey, leaving the bone white for the overall highlands material.  Creating the mare boundaries was also a challenge because I needed to ensure that the quills fit together nicely, with the sizes varying in a pleasing random sort of way.

Close-up of filled maria.
Going back and filling in the mare was very gratifying, since it made me feel like I was making a ton of progress.  But this was where the sizes of the quills really made a big difference.  Being constrained by the small areas, I had to be very careful and clever about how each quill fit next to its neighbor.  Some of the quills in this project are made from paper less than 1/4" in length, and so were pretty challenging to make and to fit into the tiny spaces they needed to occupy.  I remember doing work like this is a child, and the 'smallness' of the quills not being nearly so difficult for both fingers and eyes!

Image Credits:  My pix of my own quilling, my design!

Sunday, September 11, 2016

Quilling the Moon: Progress in the South

Some progress!
Even more progress!
As of this moment, I've finally completed my Moon, but I want to post some of the intermediate pictures to show the progress.  So I'll be finishing up the Moon blogging in another post or so.  But for now, compare the two images here and you can see how the edge of the Procellarum basin expanded towards the center of the image, and how the highlands were filled in from the right.

The mare sections at the top and left of Copernicus crater were really challenging.  As I approached the bottom of the Imbrium basin, I got more and more nervous about exactly how the basins would 'express' themselves.  I wanted them to be bold and easily recognized, but didn't want to lose the subtlety of the interesting margins, and of the craters and their ejecta.  So I moved very carefully, filling in the area to ensure that the basin would have an obvious round edge to it, but also ensuring that all the important tiny features could still be seen.

Close up of the area around
Copernicus.
Looking at the close up image makes this all seem so straightforward and easy!  But since every single quill was created on the fly - size, color, and placement - it was really very difficult.  But I do like the general effect.  It is certainly the Moon, and it has a strong mosaic look without losing the lacy feel that quilling offers.

What I'm starting to worry about now is how to hide the errors I'm spotting.  Like how my Moon is not a perfect circle anymore.  Pressure from the different areas as I glued them in place slowly altered the nature of the outline - it isn't quite a perfect circle.  I can see flatter areas, and areas with slight bulges.  Not sure how to hide this - I was already planning to put mat board around the outline, so perhaps this will make the project look more even.

Image Credits - My pix of my own quilling, my design!

Saturday, August 27, 2016

Quilling the Moon: Beginning the Design

Deep breath - start quilling.
As noted in my previous post on the topic, I made a few decisions, like size and color choices, about my Moon.  And then started in ... with more thinking ...

Experiment with some circles,
add some rays to craters.
Armed with only four colors, I considered the Moon.  How would the design look?  Too many options.  I tried a few things, big swirls say, which did not work because there just wasn't enough detail.  Teardrop shapes.  Also did not work because there are too many really small circular features I couldn't depict that way.  I considered the fact that I study impact craters as a scientist, and then I made my choice.  Circles.  Tiny circles.  I'd do the whole thing in circles - not all the same size, since that would look too mechanical, and maybe too much like cross stitch or something.  Nope, I'd vary the size but have no circles with paper longer than about 4.5 inches.  And since I roll my paper pretty tight, that's a small circle.  Most of the Moon would be done with paper in the 2 inch length zone.

Tycho and the Southern Highlands
begin to take shape.
Right.  I also decided I wanted a subtle 'ray' effect for those craters that had rays.  After all, Tycho (the big light splash of a crater in the southern part of the Moon) would just not look the same without rays.  So I started out, putting up a few strips on their side to be the outline of the Moon, and the rays.  Then I started with Tycho, filling in just around the ejecta blanket of the crater in bright white, and out a bit into the highlands with the very light ivory and then some of the medium grey.  I liked the look, thank heavens, and so was inspired to keep on going!

Image Credits:  My pictures of my own quilling, my design.

Wednesday, August 24, 2016

Quilling the Moon: Starting Considerations

Beautiful full Moon - must quill.
I've been telling myself for many, many years that I should quill the Moon in some fashion or other.  The Moon is one of my very favorite objects - I am a lunar scientist after all, and have been studying the surface of that world since I started college thirty years ago.  Thirty years is a long time to have a Moon fixation, be a quiller, and not quill the Moon.

My motivation for doing this now is mostly to have a piece to display at an upcoming science conference in October that has a small space art exhibit associated with it.  And in addition, there is a yearly competition over at Little Circles for quilling that I'm planning to enter this into, as well.

So even though I am not quite finished with my herb sampler from earlier in the year, I am plowing into another project anyway.  Well, plowing might be a strong word.  The first things I'm doing are: taking a good look at a lot of data from the Moon, buying a bunch of grey paper, and pondering what the heck to do with it.

One of the big things I'm fighting as I make this Moon thingy is my need for scientific accuracy.  I have to balance this against design and artistic needs.  This isn't a photograph I'm making after all, this is a quilled piece whose purpose is to evoke the Moon in more of an emotional fashion.  But one can't just turn off being a scientist, so that tension is informing the entire piece.

I found a picture of the Moon that I liked from my many NASA interests, and chose to blow it up to about eight inches in diameter.  I wanted to make it small enough that I'd actually complete it before a decade went by, but big enough that I could portray the craters in enough detail for my scientific perfectionism.

Paper strips, 1/4" in shades of grey.
After doing that, I bought a pile of grey paper.  I'd never bought paper from Little Circles before, so I chose to buy all these colors from their Culture Pop quilling paper line.  I'll talk more about using Culture Pop specifically in another post.  The colors, from pitch black to bright white are:  Velvety Darkness, Feathered Fedora, Steel Guitar, Bottlenose Dolphin, Indoor Recess, Fish Scales, and Photographer's Umbrella.  I went with the quarter inch wide paper instead of the normal eighth inch paper because I wanted the Moon to have a more substantial feel to it.  More mosaic-y I guess.  More depth.

My first choice in color was not to make the dark regions of the Moon out of pitch black.  As you can see from the picture of the full Moon, the dark regions, that is the 'mare' (pronounced "mar-ay") are not as black as space.  But I did want a good contrast, so I chose a very dark grey, the Feathered Fedora, as my major mare color. 

For the highlands, the brighter areas of the Moon,  I wanted to make the rayed craters the only thing in bright white.  So that meant choosing another color for the bulk of the bright areas.  I had to pick between the sort of ivory-ish color and the mottled grey color.  In the end, I liked the sort of 'bone' look of the very light ivory (thinking about bones and how these areas have a lot of high calcium rocks), and went with 'Fish Scales.'  I also decided I didn't like the sort of mottled look of the quills made with Indoor Recess, so saved that paper for other projects.  I also chose not to use the Steel Guitar at all, because it has a blue undertone that did not mix well with the Fish Scales, at least in my view.  That left me with just one more color, Bottlenose Dolphin as my intermediate grey to fill in the odd areas that are either darker highlands, brighter mare, or mixed regions with no clear color choice.

Enough for now!

Image Credits:  Moon, NASA.  Strips, my quilling strips from my supplies, my pic.

Sunday, January 24, 2016

Herb Sampler after Twenty Three Years

First pattern of twelve - Lemon Balm
As the title notes, I've had my kit for Malinda Johnston's "Herb Sampler" since the darn thing came out - 1993 I think.  Since that time I've fully intended to start (and then complete) the kit.  I've already done the Berry Sampler (completed in 1994).  I want to get the Herb Sampler framed in the same way, and hang them together in the kitchen.  Right now the Berry Sampler is quite lonely in there (and has been for twenty two years ...)

So this is the current '"Work in Progress" WIP as far as quilling goes.  I cracked open the kit and started work.  First of all it is interesting to feel the difference in papers between now and then.  Modern papers, at least in my experience, have a pretty consistent feel regardless of color.  But back then, papers seemed to vary pretty widely in texture depending on the color.  I don't know if that was an actual difference in the paper itself used for each color, or if the dye process changed the texture.  But it is pretty obvious when you run your fingertips over the strands of paper.

My framed Berry Sampler
The second thing ... It's been a long while since I've worked exclusively with very narrow width paper.  This stuff is a shade more narrow than 1/16".  Quite narrow.  And my fingers and hands are rather a bit more stiff than they used to be.  I used to love narrow paper for the lightweight, lacy effect.  I worked with it as much as standard 1/8" paper when I was a kid.  Well the years have made quite a difference, there.

Lastly, I'll mention it's fun to work from a kit again.  My last project was of my own design, and so each and every piece was unique, won't be repeated.  All my color and paper length decisions were made as I went along, along with part of the design.  It made the quilling very slow going, trying experiments (that often didn't work the first time through) and new techniques.  It was fun, yes, but sometimes frustrating.  A kit might be boring for some, given you just follow the lines, but it is a welcome break from the detailed process of design.  At least for the moment. 

I'll post some more updates as I go!

Image Credit - My pic of my own work, pattern Melinda Johnston 1993.


Monday, January 18, 2016

Getting Into the Swing Again!

Blue Flowers - What I do when I
don't know what to quill ...
After almost three months of being too swamped with chronic illness and general life craziness to be able to quill or blog, I'm finally back into it!  Thanks for sticking with me through my hiatus at the end of last year.

I returned, and after much digging through email, I found an email from another quiller asking me to change the name of my blog.  I considered this very carefully, and decided it was the most appropriate thing to do.

So here we are at the new blog site, Stories, Stones, and Spirals!  I hope you like it here, and choose to follow the blog.  I still have a lot of work to do, changing all the pointers at DeviantArt and Craftsy to point to the new blog.  I'm kind of dreading going through my DD account, because I know I've missed so much!  I hate it when life/illness or whatever keeps me away from my blogs and favorite sites for an extended period of time.  Getting back into it can be so painful.

I hope all your projects have been going well!  I'm always looking to brighten my day with beautiful quilling, so if you have a blog or twitter account you think I should follow, let me know!

Happy Quilling!

Monday, November 30, 2015

Book Review: Quilling For Beginners

Quilling for Beginners by Jean Woolston-Hamey.  Published by Kangaroo Press, Simon and Schuster, 2004.  48 pages.

I rate it ... fair!

2.0/5.0

See my post about book reviews for details about my review criteria and biases.

I'm always concerned when I put up a less-than-stellar review of any product.  I'm well aware of the time and energy that goes into a creating a book, being an author myself.  But if one can't post an honest review of one's opinion, then what is the point of a review?  As always, this is only my opinion, and that of others may differ widely.

This is a relatively short (48 page) quilling book that introduces the art of quilling to beginners, and provides a few easy projects for them to try.  It ends with a gallery of those same projects done by children.

What I liked:
The book has nice, bright color images of projects.  My copy came with a small package of paper strips on the inside back cover, so a few projects could be tried immediately.

What liked less:
The tutorial for beginners is much too short, and misses out on some important techniques such as making roses.  Some potential resources and supplies are not mentioned that are standard in other books, such as fringers, molds and such.  The overall quality of the quilling in the projects is not high, showing uneven tension and very large open centers.  The projects themselves are not terribly interesting, and I don't think they will inspire children or adults to try the craft.  There is no history section, and the gallery space could have been used better with a few more advanced projects, rather than showing children's work.

Overall, as a collector, I felt compelled to buy it.  But for a beginner, there are much better quilling books on the market.

Monday, November 16, 2015

Book Review: Pretty Quilled Cards

Pretty Quilled Cards by Cecelia Louie.  Published by Lark Crafts, Sterling Publishing Company, 2014.  127 pages. (Review updated Aug 7, 2016)

I rate it ... very good!

4.0/5.0

See my post about book reviews for details about my review criteria and biases.

Pretty Quilled Cards is subtitled "25+ Creative Designs for Greetings and Celebrations."  I rarely put quilling on greeting cards, since such cards are hard to keep and store without marring the quilling (unless you leave them out or frame them.)  But I certainly have made quilled cards on occasion, and this book has a bevy of new designs for lovers of cards, tags, and such like.  I was also thrilled to find a quilling book with a relatively recent (2014) date - as I am looking to learn new techniques and am always on the hunt for new ideas.

It is a little difficult to rate the book, because it represents a significant departure from the "traditional" or even "modern" quilling in the books of the 2000's.  This book has more "innovative" or "new wave" quilling - emphasizing very loose coils and open outlines, rather than tight, lacy coils and borders that are completely filled in.  In fact, a lot of this isn't what I'd call quilling at all but instead "Paper Outlining" or "Paper Line Art" or even "Paper Collage."  This can be misleading for new quillers.  There are techniques in this book like 'softening' and 'scraping' that you won't find many other places.  The projects themselves are a little strange in terms of how they are presented, because every single strip of paper is shown with the necessary fold marks on it.  In other words, these designs show you specifically how and where to fold every single crease in every strip of paper.  This is different from other books, so it takes some getting used to.  So comparing this book directly to the other books I've reviewed isn't as straightforward as it could be.  But I'll give it a shot :)

What I liked:
New ideas and new designs.  Almost every project has something in it, however small, that I haven't seen elsewhere.  Even if it is just a trick of folding the paper, there is something new to be had.  The book is well illustrated and photographed, with lots of color pictures of projects.  The projects are highly detailed with copious instructions.

What I liked less:
The tutorial for beginners is not straightforward, and could cause some confusion.  There is a lot of coiling, opening, and recoiling of strips to achieve the effect the author wants to see in their quilling.  This may be necessary to achieve the very specific look and effects of this book, but is not at all necessary for many other forms of quilling.  This isn't mentioned, and a beginner could come away with the idea that this book shows the 'right' way to quill, and other books are 'wrong' rather than simply thinking of this as a different approach.  (Or perhaps a different craft altogether, such as "Paper Line Art" or simply "Paper Craft" etc.)  The projects often require use of a copier, or even color copier to get all of the pieces necessary - rather than emphasizing the use of materials a quiller might already have on hand.  There is no ancillary material at all, i.e. history, gallery of ideas, etc. (you know my bias.)

I wouldn't recommend the book for a beginner.  However, a practiced quiller who is looking for ideas for cards will find much to entertain themselves with here.  I'm glad it is on my shelf, even for the relatively high going price of a new, recent book (from $15 to $20).

Monday, November 2, 2015

Book Review: Quilled Flowers

Quilled Flowers by Alli Bartkowski.  Published by Lark Crafts, Sterling Publishing Company, 2012.  126 pages.

I rate it ... excellent!

4.5/5.0

See my post about book reviews for details about my review criteria and biases.

Quilled Flowers is subtitled "A Garden of 35 Paper Projects."  It starts with a solid tutorial and introduction to quilling supplies, then moves right into the flower projects.   There is no history section nor gallery. 

What I liked:
First of all, I was not expecting new ideas about flowers in any quilling book, given how overdone the subject is.  BUT I was pleasantly surprised by Quilled Flowers.  There are plenty of new ideas and designs in this book.  And this is a very pretty quilling book, with tons of color images all laid out very well.  In many cases there are close-ups of the finished work so you can see exactly what you are doing.  The quality of the quilling is generally good throughout the book (see below).  The finished projects are all quite aesthetically pleasing, and make you want to try them right away.  I think this book does well at achieving its goal.     

What I liked less:
I wanted the tutorial to be longer, more detailed, and just generally meatier.  And of course I wanted a gallery of amazing flower projects at the end ... I always want a gallery.  I was not impressed by the use of chalk and ink to change colors - this is just a bias of mine, where I like color variation to be achieved by the use of different kinds of papers, not inks.  I did note some inconsistency in the quality of the quilling (some flowers with larger open centers, large 'tags' in the center, etc.).

I think anyone will be able to find a project they like in this book, from beginner to advanced.  But I think it is more suited to the moderate level of quiller.  The paperback is going for less than $12, which I think is a fantastic price for what you get here.

Monday, October 19, 2015

Book Review: The New Paper Quilling

The New Paper Quilling by Molly Smith Christensen.  Published by Lark Books, Sterling Publishing Company, 2006.  127 pages.

I rate it ... good!

3.4/5.0

See my post about book reviews for details about my review criteria and biases.

The New Paper Quilling is subtitled "Creative Techniques for Scrapbooks, Cards, Home Accents and More."  It starts with a detailed tutorial and list of supplies for beginners.  Then the rest of the book is used to cover many different projects including motifs, frames, miniatures, mobiles, and more.

What I liked:
The book has a very nice presentation that I'm coming to expect from Sterling Publishing - nice pictures, good page layout, lots of color.  The projects have plenty of detail so they can be easily reproduced.  The "dazzling paisley mobile" is particularly interesting.  The tutorial for beginners is nicely fleshed out.  The quality of the quilling in the book is very good, and consistent throughout.

What I liked less:
I do not see that the book fills the niche of "new" quilling - what is here is largely standard.  Other than the embossing of the tulips and the interesting abstract paisley mobile, I do not see much here that is particularly new.  Many of the projects seem to use crimping as the particular technique to add interest, but this is a very old technique.  Many other projects are not very involved, and will not hold the attention of a moderate to advanced quiller.  There is no gallery, and I feel a book about 'new' quilling should certainly have a gallery of innovative designs.

New it is available for $13, which seems a bit much (although as a collector I paid it).  Used, the book can be had for as low as $2, which is pretty unbeatable for just about any interested quiller who wants a few more ideas to draw upon.

Monday, October 5, 2015

Book Review: Great Paper Quilling

Great Paper Quilling by Mickey Baskett.  Published by Sterling Publishing Company, 1999.  128 pages.

I rate it ... very good!

3.7/5.0

See my post about book reviews for details about my review criteria and biases.

Great Paper Quilling starts with a brief section for beginners - a tutorial on how to quill and an explanation of necessary tools and supplies.  Then the book quickly gets into the projects, designed by a host of different quillers.  The projects include: frames, motifs, flowers, insects, jewelry, letters, miniatures, snowflakes and more.  There is no gallery at the end.

What I liked:
The book is well produced with lots of nice color images.  The projects are well presented (and given the nice pictures, the projects are, for the most part, easy to follow.)  There is something for everyone here.  Since a number of designers are represented, the book does not get repetitious.  

What I liked less:
The tutorial section is quite small.  I can see a book like this opting out entirely, given this is supposed to be 'great' paper quilling, but if it is there, then I have a bias that a tutorial be substantial.  Some of the projects seem basic, again for a book of 'great' quilling, while others, like the quilled church, are quite large in scope.  There is no gallery at the end, and I expected to see more quilling inspiration there.  Because the quilling is created by different designers, the quality and nature of the quilling isn't consistent throughout the book.  Overall, I don't think the book quite hits its intended mark of 'great' quilling.

I'm glad to have the book on my shelf, and do flip through for inspiration now and then.  I think it is best suited for moderately experienced quillers, not beginners, since the tutorial is so short.  Advanced quillers may find the designs too basic.  Current prices - new at about $15, the book may be just a tad pricey, but used for less than $4 is a steal.   

Saturday, October 3, 2015

Artist Interview: Philippa Reid


I'm very pleased to be able to post this interview with quilling artist Philippa Reid!  She has provided a wealth of information about her quilling life, as well as the Quilling Guild (UK) and their magazine, Quiller's Today!

1. How old were you when you started quilling, and how did you get involved?
I first got into papercrafts in 2007, when I was about to retire from full-time work at the age of 52. In those days I was a burned-out freelance writer, desperate to free myself from the relentless pressures of a career in marketing/PR, and ready to divert my creative energies into something visual rather than verbal! I received a catalogue through the mail containing intriguing details of a kit for making paper roses ... I sent for it, and received some interesting papers, punches, a needle tool and a packet of card blanks. I hadn't ever thought of making cards before, so I bought a book on the subject which included individual chapters on different card-making techniques, one of which was quilling! It gave details of some very simple projects based on closed loose coils which fascinated me at once. I had never seen quilling before, but I immediately fell in love with the look and the idea of paper filigree work. I bought a pack of multi-coloured quilling strips, a cheap and nasty plastic slotted tool (quickly discarded in favour of the needle tool that had come with the rose kit) and set about teaching myself to quill from specialist books and information that I was able to obtain on the internet, especially through people's blogs.

As soon as I got to grips with quilling, I wanted to do it 'differently' and to do it for a purpose. It's very much part of my nature to think creatively about unusual applications for things and push the conventional boundaries of my chosen art. So I experimented, beginning by combining quilling with photographs and digital graphics to create unusual greetings cards which I sold at my local village market. I designed and created quilled earrings and other types of jewellery which also proved to be popular. I learned to cast moulded acrylic shapes, creating paperweights with quilled motifs (and other things!) embedded in them. I started a blog, too, in which I shared my experimental endeavours with quilling - it quickly gained a significant following. Latterly, I've got more into creating framed pictures, moving away from cards and jewellery to concentrate on larger projects. All this brought me a level of creative satisfaction which I had not experienced in the world of work for a very long time.


2. What is your favorite project(s) that you have quilled? Was it a gift or a special occasion?
I think my favourite project so far has been a piece which won three awards in The Quilling Guild competitions for 2014. It's called 'Bordering on Antiquity', and was made partly for the Guild's competitions and also as an Accreditation project. My aim was to explore the artistic potential of intersecting circles using various border techniques that are evident in antique quilling, creating a piece which uses traditional quilling methods to produce a design which is unashamedly modern!


3. What is your current quilling work-in-progress?
I'm in desperate need of one!! My last project - the quilled fantasy octopus - occupied me for about six months, and was made as a competition entry for two events in 2015. Having just returned from The Quilling Guild's annual meeting at which it was most recently exhibited, I'm ready to start a new project but haven't yet decided what it's going to be. I feel lost without a current work-in-progress!

4. Where do you get your ideas for new projects?
From nature, architecture and other art forms. I tend to get a basic outline for an idea, start it, and then make it up/refine the detail as I go along! I am not a conventional quiller: I don't use patterns, and I'm not really into floral arrangements, cute characters or 'twee' images. My tendency is towards the abstract, and for that reason my work tends to be very different from 'mainstream' quilling art.

5. Do you have any special or long term goals for your quilling? (maybe win a prize at a craft fair, sell quilling online, create a particularly impressive piece, etc.)
I'm delighted to say that I have won several prizes over the years, not just with The Quilling Guild, but also at a major regional country show and a national Women's Institute competition. I don't sell at the market any more, as I wanted to free up my time for my growing involvement with the Guild and to tackle larger quilling projects. I love receiving commissions to create quilled pictures, and I have also had work on show in a local gallery which brought me a great deal of satisfaction. I enjoy doing workshops and demonstrations, and hope to do more of this, delivering activity sessions at outdoor events, in elderly care homes and at children's parties. I think, most of all, I would love to provide a student with one-on-one tuition, perhaps helping a promising youngster to develop creatively using quilling skills taught to Quilling Guild Accreditation standards.

6. How do you find and communicate with other quillers in the community?
The internet has always been my window on the quilling world, where my online persona is 'Quilliance'. In addition, of course, it is always wonderful to meet with fellow quillers face to face through Quilling Guild events. In the village where I live (in southern England), I became quite well known locally for my market activities, and people still come to me privately to commission work or book the occasional demonstration.


7. How long have you been a member of the Quilling Guild? What got you involved with the Guild?
I joined The Quilling Guild in 2010, having read about it first on the internet. At the time, the current Membership Secretary lived just a few miles from me, and invited me to participate in her local quilling group, which I still do to this day. Learning of my background in marketing and recognising my enthusiasm, she nominated me to join the Guild Committee, which I did in 2012. As a Committee member, I was keen to use my professional experience to help promote the Guild in order to try and attract new members in the internet age. I launched a private blog for Quilling Guild members, called 'Quilling Now!', which has proved to be very successful, and also re-vamped the Guild's website at www.quilling-guild.co.uk. In 2013, when the previous Editor moved on, I volunteered to take on the Editorship of the Guild's magazine, 'Quillers Today'. That same year, I succeeded in gaining Accreditation from the Guild in respect of my technical quilling skills.

8. Tell us more about editing "Quillers Today" - what interests you as an editor, and how can members best use and contribute to the magazine?
After a long break from writing, it has become an absolute joy for me to commission, edit and originate articles about a subject that I truly love. I can honestly say that being the Editor of 'Quillers Today' - a 32-page, full colour seasonal magazine - is "the best job that I never had"!! I keep my eyes open online to watch what is going on in the world of quilling, and never hesitate to approach Guild members and ask them if they would be willing to share information about what they are doing in the magazine. Mostly, they are delighted to oblige! Of course, I'm always happy to receive unsolicited material, too! My aim is to make it easy for people to contribute. Not everyone has the time or confidence to write articles themselves, so I just ask them to send me the basic facts about a project or activity in note form, together with some relevant photos, which I can then pull together into a magazine feature on their behalf. When people tell me that they like the combination of patterns, projects, news and features that I put together in the magazine, it really is music to my ears!


9. How do you stay current with new techniques and trends in quilling?
The Quilling Guild's annual 'Quill, Chat and Chill Days' provide a great forum for sharing and learning new techniques. I also keep a close eye on developments in the online quilling community via social media and people's blogs.

10. What one aspect of or technique in quilling do you really want to learn (or learn to do better)?
The quest for perfection is ongoing, especially in terms of achieving perfectly round and regular closed loose coils!

11. Do you have a blog/website/online gallery?
Yes, I have several links I can share with you:
My current blog: http://quilliance.wordpress.com
My original blog: http://quilliance.blogspot.com
Photos of my work on Flickr: http://www.flickr.com/photos/philippa_reid/
Quilliance on Facebook: https://www.facebook.com/Quilliance-151266724899022
My quilling workshops and demonstrations: http://learntoquill.weebly.com

Image Credit:  All images belong to

Saturday, September 26, 2015

Poinsettia Flower Ornament Revisited

As you know I posted the directions for my Poinsettia Flower Ornament here on the blog a few weeks ago.  (I had also created directions for my Halloween Sampler, and posted that up at Craftsy for a fee.)  It occurred to me that the directions for the simple poinsettia flower might be a nice thing to post for free, so that's what I did.

I am astonished to say that the Poinsettia Flower Instructions have been downloaded from Craftsy more than a hundred times already!  This means a couple of things to me - people really like free patterns (of course) but also, that there is a demand for really simple quilling patterns.  I am surprised, actually, but it has been ages since I was a beginner at quilling.  I'm having a little trouble imagining what it is like ... especially since there was no internet nor computers when I first started.  I learned all my material from books or from patterns I purchased.

These days, of course people are turning to the internet before anything else.  Why buy a potentially expensive book when you can download patterns for free, and get all your instructions on free videos from various sites?  Seems like a smart way to start and see if you like a craft before making more of an investment in time and money.

So I'll be thinking of ways to post other, small, free patterns and hope they are as useful and popular as the poinsettia!  I wish I had written down the directions for my candy cane when I made it.  I'll have to be more thorough when I make new pieces - someone else might want to make them, too!

Monday, September 21, 2015

Book Review: Paper Quilling for the First Time

Paper Quilling for the First Time by Alli Bartkowski. Published by Sterling Publishing Company, 2006. 112 pages.

I rate it … very good!

4.4/5.0

See my post about book reviews for details about my review criteria and biases.

If I had an adult friend who was interested in learning quilling, this is probably the book I would get for them.  This book almost has it all, and what it does have is nicely photographed, well detailed and a pleasure to use.  I don't think I'd use it for a young person (projects are more functional rather than just fun), but I think the book is well suited for an adult.

What I liked:

This book is laid out a little differently than others, focusing on beginners and their questions.  Each section (such as Section 2, The Basics) is motivated by subheadings in the form of questions (such as How do I make a folded rose?).  This lends a relaxed feel to the book that I think would appeal to a beginner.  The quality of the quilling is very good throughout the book.  The tutorial shows examples of good and poor quilling, and what can cause problems.  All the necessary techniques are illustrated, and then some.  Pictures are plentiful, and instructions are clear.

What I liked less:

I really missed a history section, but you know my bias there - I just think a beginner's book needs some history.   I thought the projects got a little too difficult too quickly, but this is a minor point.  The projects were not as appealing to me as some other books, but given I'm not a beginner, the book isn't targeted to me.  I thought some of the projects needed more detailed line drawings of the actual patterns.  The gallery of projects at the back is nice, but I wanted more.  (I always do :)

Overall, I'd recommend this book for an adult beginner.  As a collector I'm glad to have it on my shelf, and there are a few tidbits here and there that help spark the imagination even of a seasoned quiller.

Thursday, September 17, 2015

Halloween Sampler - First Projects

As promised, I'm going to post the instructions for my Quilled Halloween Sampler here on the blog.  This is the third post; time to get into the projects!

First post -  Halloween Sampler
Second post - General Instructions and Mat board

And remember, if you want to download all the instructions right now in one go, then head over to Craftsy where I have them posted for $3.99.


BONUS Project:  Quilled Candy in Wrappers

Materials:
- white, 6 strips at 4” long (wrapper)
- white, 3 strips at 8” long (candy)
- bright yellow, 1 strip at 8” long (candy)
- light red, 1 strip at 8” long (candy)
- purple, 1 strip at 8” long (candy)
- orange, 1 strip at 8” long (candy)
- black, 1 strip at 8” long (candy)


Here is an easy project to start off that’s not shown in the sampler – quilled candy in ‘wrappers.’  Start by stacking (right on top of each other, NOT end to end) the red, yellow, and white strips all at once.  The white strip should be on the ‘bottom.”  Roll the three strips up all at the same time.  The three colors swirl together as you roll them.  Make sure the white ends up on the ‘outside.’  Form a circle (the colored strips might need to be trimmed to hide them under the white.) 
Make two triangles with 4" of white paper each.  Curve one side.  Glue these with the curved side out, to either end of the circle.  Repeat with a stack of green/purple/white, and then a stack of orange/black/white.

Project #1:  Flying Bat

Materials:
- black, 8 strips at 6” long (wings)
- black, 1 strip at 9” long (body)
- black, 2 strips at 2” long (ears)
- black, 3 strips – from ¾” long to 1.5” long (small bats)
- bright yellow, 1 strip at 10” long (moon)

First make eight circles with the 6" black strips.  Form these into triangles, but curve one side of each.  Glue these together as shown to form two wings. (Each wing has three triangles pointed ‘up’ and one pointed ‘down’.) 

For the body, take a 9" black strip and make a teardrop.  Take 2" black strips and form them into long triangles for the ears of the bat.  Glue the pieces together. 
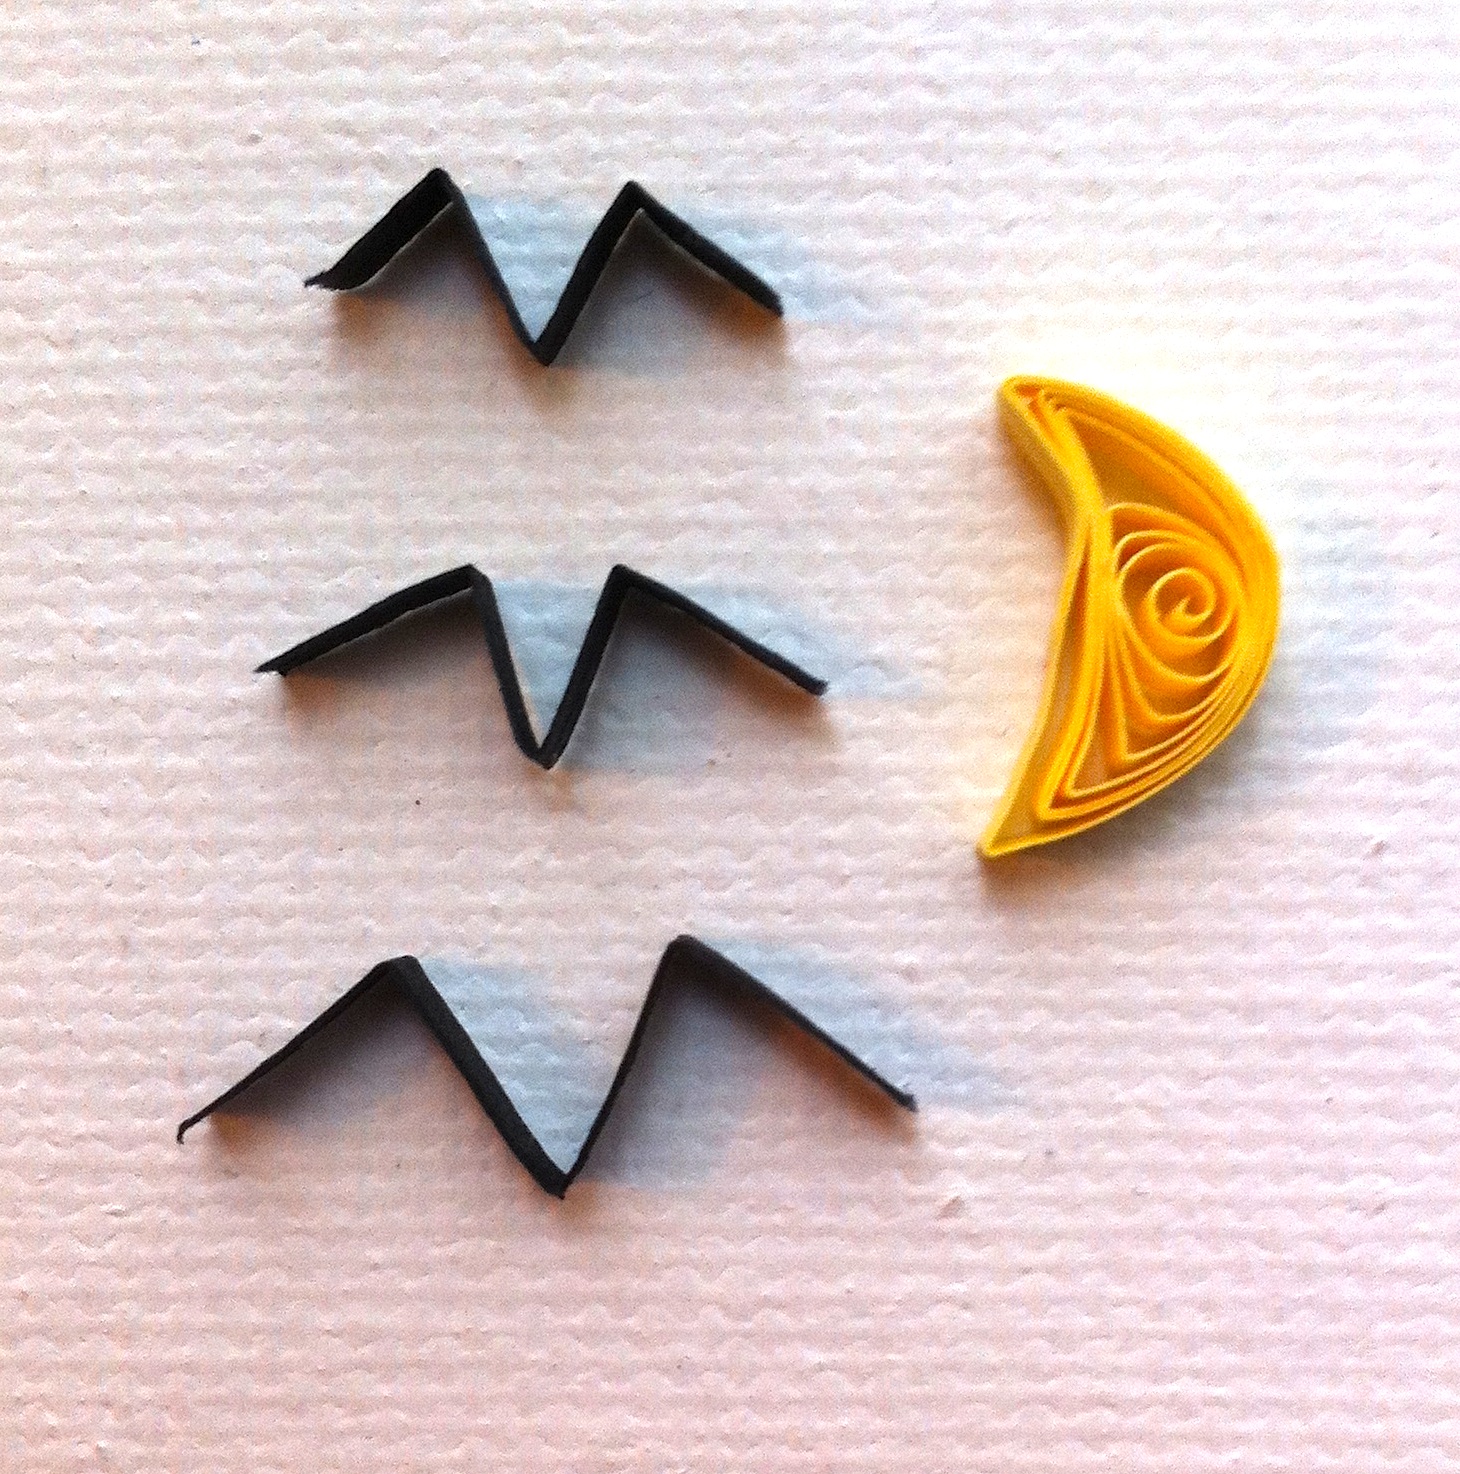
Take three black strips that are from 3/4" to 1.5" and make "M" shapes (other bats).  Use a 10" strip of bright yellow in the form of a crescent to serve as the Moon.

Glue these pieces into the mat board – right side middle square.

Image Credit - My pix of my quilling, my designs

Tuesday, September 15, 2015

Quilled Halloween Sampler - Starting the Directions

Empty mat board ready for quilling!
As promised in my first post on my Halloween Sampler, I'm going to post the instructions for the Sampler here on the blog.  It's a lot of material, so it will take several posts to get it all up.  No time like the present!

And remember, if you want to download all the instructions right now in one go, then head over to Craftsy where I have them posted for $3.99.

Here's where it starts … General Instructions

The rest of the projects in the Sampler assume you have read and followed all of these instructions.

Difficulty: 
Overall, the level of this tutorial is “Beginner” with some elements that are “Intermediate.”  If you are a “Novice” (that is, if you have no experience with quilling) you will first need to find a book or online tutorial that shows you how to quill, and how to make all the standard shapes, such as roses, coils, off-center quills, and more.  Practice making these shapes and doing some basic projects to learn about how to use the materials, etc.  Then you can proceed to use these instructions.  These projects are listed in order of increasing difficulty.

Photos:
Photographs are not to scale!  They are only for reference!  Some are close-ups and some are zoomed out!  They do not show the exact size of the intermediate or finished projects.  So do not print them out and quill over them!  Make the shapes as directed in the instructions, and glue them together in the ways shown in the pictures.  You can get an idea of the size by looking at the front cover (the image from the last post of the whole sampler).  Each of the boxes, including the black outline, is 3x3 inches tall and wide.  The black lining takes up ¼” on each side of the box, and the top and bottom.  So the white space inside each box is 2.5”x2.5” on each side.

Materials: 
This tutorial assumes you have access to a variety of colored quilling papers, (but feel free to make substitutions for color as you like when you go along).  When not stated, the width of the paper is the standard 1/8 of an inch.  Other papers used are 1/4 inch wide paper and 1/16” (inch) wide paper.  You will need scissors and white craft glue.  Tweezers and a quilling craft board with pins would be very helpful.  If you wish to make the mat-board for the whole sampler, you will need the materials listed in that section.

Length of Strips:
Remember as you are working through this project, and all the other projects, that the length of strips listed may not work perfectly for you.  Some people roll quills tighter or looser than others, and so need a bit more or less paper to get the same size in the final piece.  Also, some paper is thicker than other paper.  Be prepared to experiment to get the results you want.  Use the lengths of paper suggested as a guide that you can detour from whenever necessary.

Make and Use What You Like:
Some of the projects have additional pieces you can make, like the ghost has a swirled ‘fog,’ the vampire fangs have a thorny rose, and the pumpkins have coiled vines around them.  You can choose to make all the pieces and frame your sampler together, or just make the pieces you like and use them on cards, gifts, and whatnot!

Displaying Your Projects - Creating a Mat Board

Materials:
- One piece 12”x12” cardstock, medium grey (top)
- One piece 12”x12” cardstock, white (bottom)
- Black quilling strips, 1/4" wide

As I mentioned, you can use these designs and motifs in a variety of ways. I decided to put all of mine into small 3x3 inch 'vignettes' and show them off together as a “sampler”. To do this, I purchased two pieces of good 12x12 inch cardstock, one in a medium grey (top layer) and the other in white (bottom layer).

I cut 3x3 inch holes in the grey cardstock, measuring a one-inch margin all around the outside, and a half-inch between each of the 'windows.' I glued the cardstock pieces together, and then lined the inside of each of the 3x3 inch windows with 1/4" width strips of black quilling paper so it would look like a double mat.

If you like, you can frame your project when it is complete. I suggest a shadowbox frame with at least ¾” of clearance between the background and the glass. The rose sticks out about that far, and you don’t want to squash it or any of the other elements that have relief.

I found a standard 12”x12” black shadowbox frame with an inch of depth inside, and used that.


Image Credit:  My pix of my mat boards, my design.

Monday, September 14, 2015

Ideas for Quilling - Designs and Motifs of Ancient Mexico

Books on designs and motifs.
As I mentioned in my post "Ideas and Inspiration for New Quilling" one of my sources for new ideas are books with designs and motifs around a given theme.  My theme for today is "Ancient Mexico."  In this case the motifs are from the native cultures of that part of North America.

The classic calendar - I'd love to
quill it, but just haven't
quite figured out how, yet.
I lived for 14 years in southern Arizona, and came to appreciate and enjoy a lot of the native art from both that part of the US and of Mexico.  I've always wanted to spend some time quilling some related art of my own, but just haven't focused on it yet.  There always seems to be something more pressing.  Still, I have the books as well as so many pictures taken during those years, and so I can't say I don't have quite a bit of inspiration right at hand.

A smaller motif perfect for
a quilling project.
At first I was concerned that all the designs would be too difficult.  The initial designs I encountered were very complex - like the Aztec calendar.  I thought designs like this were amazing, but I didn't want to quite commit to figuring out how to quill a highly involved scene (at least back then).  But as I looked, I eventually started finding smaller motifs, and began to find a bit more practical inspiration.

These native motifs are not quite the same as say Celtic ones, where you have a lot of ready made knots and spirals right there to follow.  Instead, these designs have other elements, such as dots, feathers, and plenty of curving shapes.  They are really perfect for quilling, just in a different way.  I'm planning to quill the motif above.  I can envision places for fringe, feathers, long coils of paper, and more.  Now I just have to figure out what all the colors should be :)  And I'm not giving up on quilling the calendar.  Just ... maybe not right now.

Image Credit:  My pix from my books.  They are:  Ancient Mexican Designs by Gregory Mirow, and Design Motifs of Ancient Mexico by Dover Clip Art.

Thursday, September 10, 2015

Quilled Halloween Sampler

I've been considering making a sampler of quilled Halloween projects for a long time.  I love Halloween, and often use small designs and motifs on place cards, tags, ornaments, wall art, and more.  I've never bothered to actually write down any of my designs before - so they come out differently every year, AND I have to spend extra time and paper trying to figure out what I did the last time around :)

So this year I spent the time and effort to record all my paper widths, lengths, and shapes as I worked.  I also took a few pictures of the intermediate stages as I went along.  I realized when I was close to finished that I might not be the only person who would like to use the directions.  So to make up some of the resources I used, and to cover some of the time (it took a loooong time to write this up), I decided to post all the instructions for a fee over at Craftsy.  So if you are in immediate need of some ideas for Halloween, look no further!  You can download all 16 pages of Halloween packed PDF for $3.99.

OR if you can wait, and don't have the extra $$, then keep your eyes here on the blog.  I'm going to post all the instructions in pieces right here between now and Halloween!

Here's the blurb from over at Craftsy:

The Quilled Halloween Sampler Instructions will tell you how to make nine different small Halloween themed projects (plus a bonus project!). The 16 pages are packed with pictures and ample details of paper quilling for you to recreate the sampler, or use it to come up with your own scary ideas!

These spooky designs can be used together to form a framed Halloween sampler group, or they can be used separately on greeting cards, gift tags, place settings, ornaments, wall art, or in whatever way suits your fancy! You can be creative and detour from the exact directions whenever it suits you and your project needs.

Some of the projects are very quick, while others are a little more involved, so you can fit the projects to the time you have available. Most of the designs are suitable for someone who knows the basics of paper quilling (beginner), while a few others are suitable for an intermediate level of quiller.

Most of the designs and motifs will be familiar, like bats and pumpkins, while others will be more unusual, like vampire fangs and skeleton keys. Let your creepy side out and enjoy some Halloween fun with the Quilled Halloween Sampler!

Monday, September 7, 2015

Book Review: Quilled Borders and Motifs

Quilled Borders & Motifs by Judy Cardinal.  Published by Search Press, 2008.  48 pages.

I rate it ... good!

3.2/5.0

See my post about book reviews for details about my review criteria and biases.

This is a sturdy little (48 page) quilling book that introduces a host of small designs in many themes (i.e. baby, wedding, holiday) for use in a variety of situations (i.e. cards, frames, ornaments).  I do not have a long review for this book - regrettably, as I'll note later, the publisher made a bad decision in reproducing much of the content within another book.

What I liked:
The huge variety of little projects and designs that can be used alone or together to make wall art, greeting cards, frames for invitations and announcements, and so much more.  I think this would be a good book to show to children to get their ideas flowing.

What I liked less:
As noted, the publisher made a bad decision (in my opinion) and included ALL of the motif section inside of another book (Beautiful Quilling Step-By-Step, which I'll review another time.  It has material from several books, in fact.)  This decision by Search Press makes me nervous when looking at any of their books.  I have to ask myself, "Do I already own this in another form?".  The work is reprinted exactly, page for page, materially damaging the usefulness of both books.  It's a shame since it robs each book of originality and usefulness.  Another issue with the book is the uncertain quality of the quilling - for example, the quilled heart within the tutorial on page 14 shows uneven tension (visible in several of the projects in the book, as well.)  The book has few actual patterns for the designs, making more difficult for beginners, and a bit less intuitive, I think.

As a collector of quilling books, I am happy to have it in my collection.  But for the current going price of $10 or so, I'd probably go for the larger Beautiful Quilling book instead of this one, were I choosing between the two.

Saturday, September 5, 2015

Quilled Holiday Ornaments for the Charity Project

In the end I quilled three ornaments for the "Quilled Ornament Charity Project" (even though when I made the poinsettia, I said I'd only make two).  I knew from the beginning that I didn't want to make snowflakes, since I am assuming Carie is going to get sent a ton of snowflakes.  So I concentrated on other designs that I thought would look good in a green tree.

The candy cane idea came to me as I was considering how I could use white paper for something other than snow.  I made the entire candy cane out of white, and then for the stripes, I just wound one long red strip around the piece and glued the ends down.  To add some interest, I embellished with a sprig of holly.  The star is made only from triangles, circles and eye shapes in white and yellow.  Hopefully it doesn't look too much like a snowflake :)  I didn't want to make it solid yellow, though, since I thought that would been a little boring to look at ...

So off they go to their new home, to be placed on a tree and auctioned off for charity.  Remember that the deadline for ornaments is October 15!  There is still plenty of time to quill a piece or two and send it off.  Shipping is cheap because they hardly weigh anything at all :)

Image Credit:  My pic of my own ornaments.  Designed by me.