Showing posts with label kits. Show all posts

Monday, October 31, 2016

Halloween Sampler - Projects #8 and #9

This is the last post for the Halloween Sampler!  Finally ... I hope these instructions are of some use, and that you have fun making a few of these little projects, or the whole sampler!

I particularly hope you have fun with the projects that are a little more unusual - there are lots of patterns for pumpkins, but vampire fangs and skeleton keys are a little more hard to find.

This post covers projects #8 and #9 (out of nine).  I've already posted the general instructions, the mat board cutting instructions, as well as projects #1 - #7 and a bonus project!

First post -  Halloween Sampler
Second post - General Instructions and Mat board
Third post - Bonus Project and Project #1
Fourth post - Projects #2 and #3
Fifth post - Projects #4 and #5 
Sixth post - Projects #6 and #7 
Seventh (and last) post is this one! - Projects #8 and #9

And remember, if you want to download all the instructions right now in one go, then head over to Craftsy where I have them posted for $3.99.

Project #8:  Vampire Fangs

Materials:
Mouth
- bright red, 2 strips at 8” (upper lip)
- bright red, 1 strip at 12” (lower lip)
- bright white, 2 strips at 3” (fangs)
- dark red, 1 strip at 6” (blood drop)
Thorny Rose Vines
- bright red, 1 strip at 12” (rose) 1/4” wide strip
- olive green, 2 strips at 5” (vines)
- olive green, 4 strips at 2.5” (thorns)
- dark red, 1 strip at 3” (blood drop)

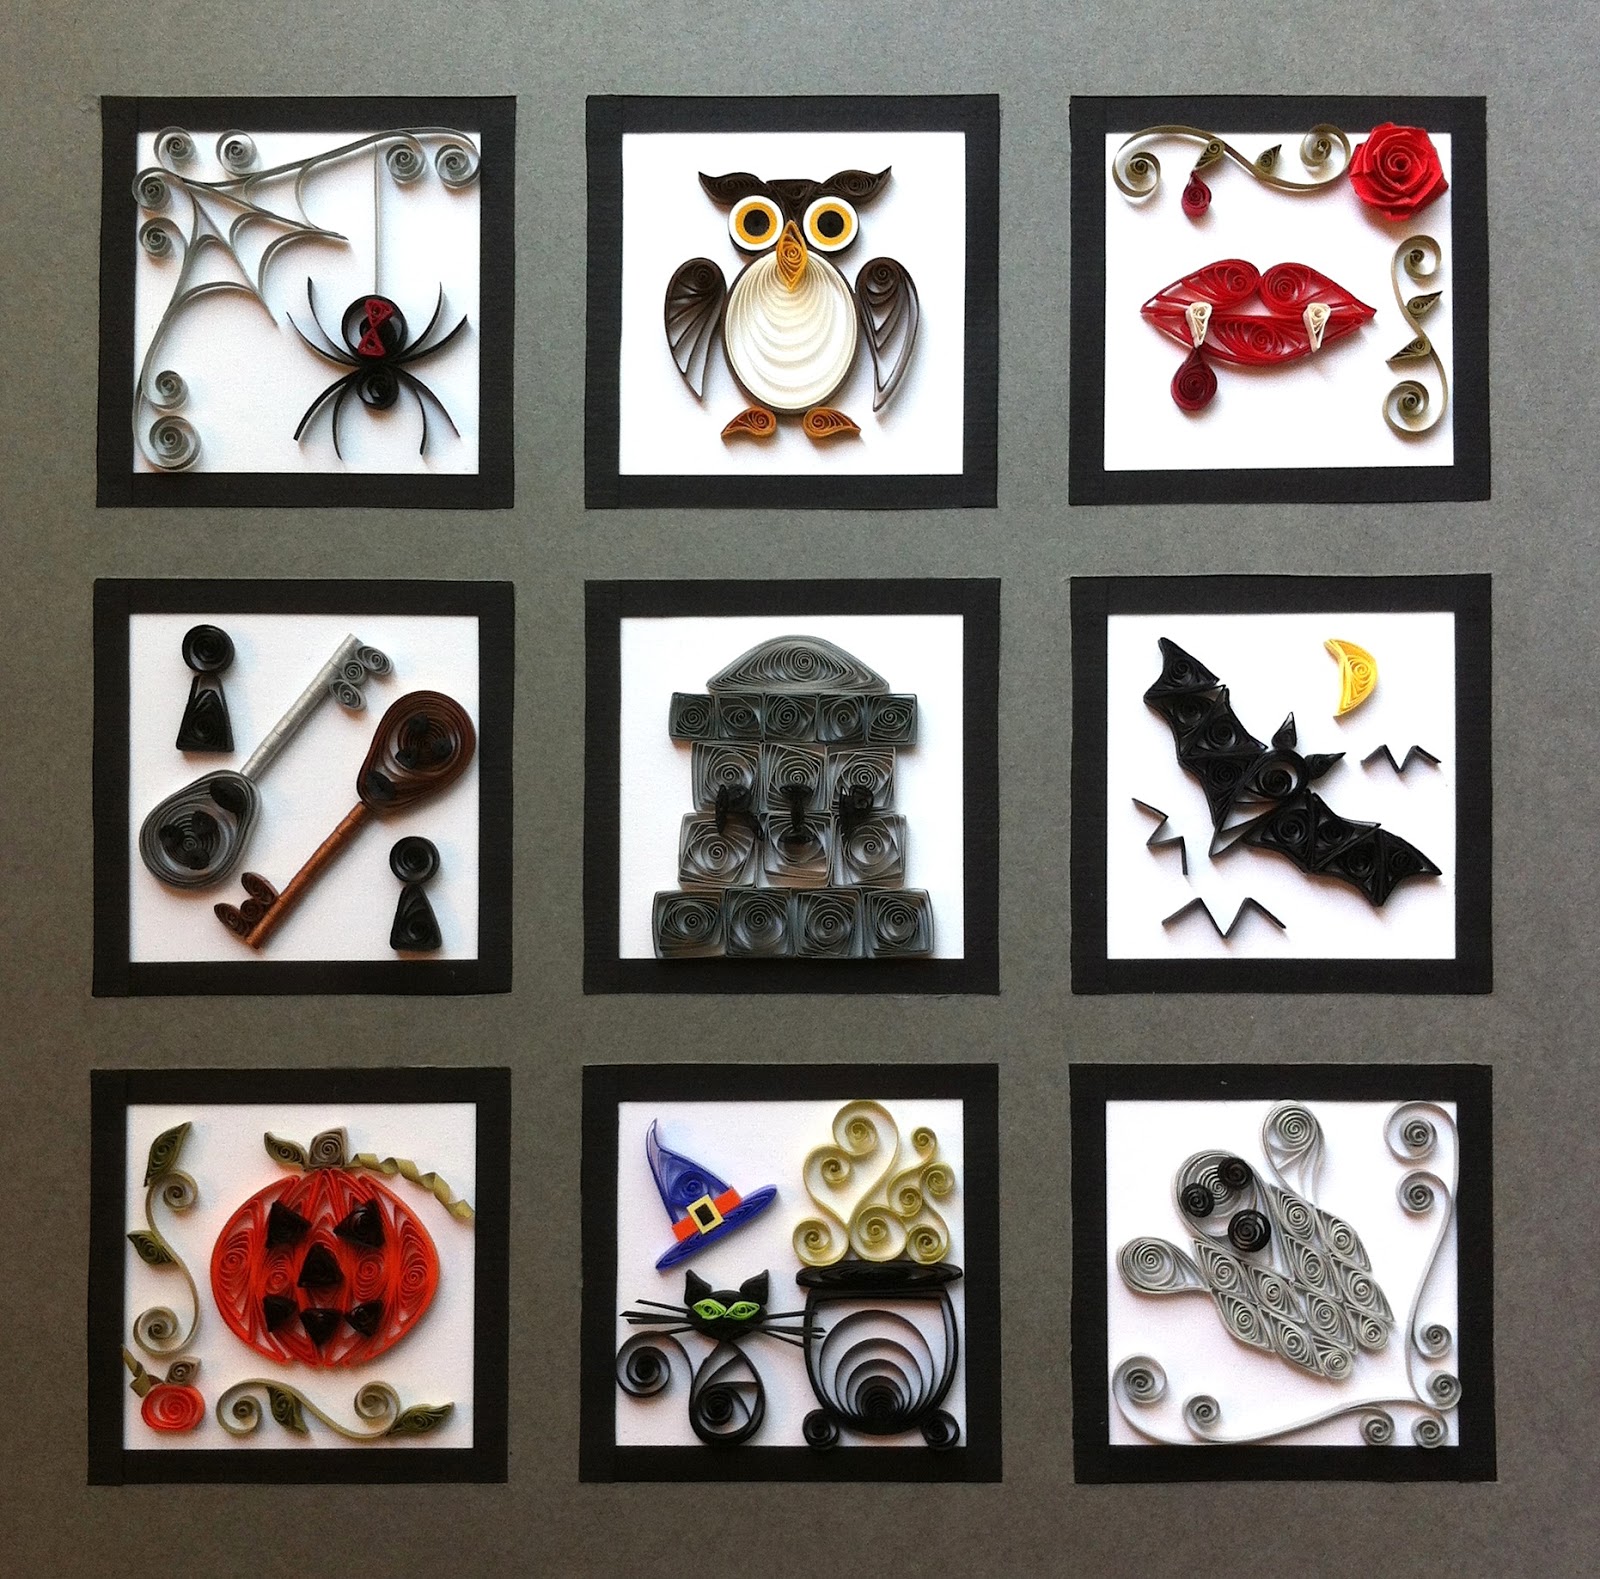
Start by using 2 of the 8" bright red strips.  Make two long teardrops.  Make a long, flat semi-circle with the 12" strip.  Glue these three pieces together as shown to form lips.  Form fangs by taking the 2, 3” strips of white and making long triangles.  Glue these on top of the lower lip.  Make a teardrop out of the 6” dark red strip, and glue it to the lower lip so it appears to be dripping off of one of the fangs.

Make a rose from the 12” strip of 1/4" wide paper.  Make two long “S” coil shapes from the 5” olive green strips.  On each of these “S” shapes, glue two thorns.  The thorns are long triangle shapes made from the 2.5” long strips of olive green.  For a final touch, create a small teardrop shape from the 3” dark red strip and position it so it drips from one of the thorns.

The fangs and thorny vines are found in the upper right square of the sampler.  Glue the pieces into place there, the square in the top, right column.

Project #9:  Witch’s Lair

Materials:
Hat
- bright purple, 2 strips at 10” (hat)
- orange, 1 strip at 1.5” (sash)
- yellow, 1 strip at 1” (buckle) ¼ wide paper
- black, 1 strip at 1/8” (buckle)
Cat
- black, 1 strip at 9” (body)
- black, 1 strip at 5” (head)
- black, 1 strip at 4” (tail)
- black, 1 strip at 2” (whiskers)
- black, 1 strip at 2” (nose) 1/8” narrow paper
- black, 2 strips at 2” (ears)
- neon green, 2 strips at 1.5” (eyes)
Caldron
- black, 1 strip at 25” (pot)
- black, 1 strip at 12” (lip of pot)
- black, 2 strips at 3” (feet of pot)
- green/yellow, 4 strips; 5”, 4”, 3”, 2” (poison fumes)

To make the witch’s hat, start with a 10” strip of bright purple and form it into a long triangle, with the tip slightly bent.  Make a circle out of the other 10” strip and squash it flat to form the brim of the hat.  Glue together.

Use the strip of orange and wrap it around the bottom of the hat just above the brim.  It should go across the front and down both sides of the hat (but not around the back).  Trim the strip to fit if necessary. 

To make the buckle use the bit of 1” yellow wide width paper, cut a small rectangle.  Use the black paper to cut an even smaller rectangle, as shown.  Glue the black rectangle onto the yellow one.  Now glue this onto the hat, on top of the strip of orange.  (You can also make a nice hat from other colors, such as black and dark green, and use strips of different colors as well for the sash.)

The cat’s body is made from a wide teardrop formed from the 9” long strip of black paper.  The 5” strip should be formed into an eye shape and glued on top of the teardrop.  Use the 4” length of black to form a tail, curving and trimming into whatever shape pleases you.  Make two ears by making long triangles from the 2” strips of black paper.  An image of the back of the finished cat is shown.

The face is more detailed, and getting a good picture was hard.  First, make two eye shapes from the neon green, and glue them to the upper part of the head, just under the ears.  Now take the 2” strip of black and use the scissors to cut it lengthwise into 4 very narrow strips.  Center these under the cat’s eyes, and fan them out a bit to look like whiskers.  Glue into place one at a time, right on top of one another.  Just use one tiny dab of glue at a time, and then put another whisker down, and glue that.  On top of the center of the whiskers, you will put the nose.  The nose is a triangle made from the 2” strip of narrow black (although regular width would work fine, using narrow width paper here helps to keep the nose from poking out, and hides the middle of the pile of whiskers where you glued them in place.)  Glue the nose.  Trim the whiskers to be the right length for your project.  (mine stick out about ½ to ¼ of an inch from the nose on either side).

The boiling caldron starts with the 25” strip of black, rolled into an offset-circle.  Put the center of the offset at the bottom, and flatten the top of the circle to be the top of the pot.  Use the 12” strip to form a circle, and squash it flat to make up the brim of the pot.  Glue in place.  The feet of the pot are made from the 2, 3” strips made into circles.  Glue to the pot.

The poisonous fumes are made from four pieces of yellow/green paper of various lengths.  Each is made into an “S” Shape and glued to the top of the pot, and to each other wherever they touch.  I used 5”, 4”, 3”, and 2” length strips.

Arrange the hat, cat, and caldron in the lower, middle square.  Glue into place in the middle column, bottom, as shown.

Image Credit:  All my own pictures of my own quilling, all my own original designs.


Saturday, March 12, 2016

Herb Sampler, Selling Your Work, and More

Lovage - My favorite herb in the kit so far!
So as I mentioned in my first Herb Sampler post, I've finally gotten down to doing serious work on this project I've been meaning to get done for more than two decades.  It's a pretty good kit, this Herb Sampler, similar to the Berry Sampler in many ways.  But there are a few differences that make the Berry Sampler superior, I think. 

First of all, the berries are more three dimensional.  The leaves and such in the berry kit are more tilted, giving the whole piece more of a living feeling.  And the second issue is that this is the first time I have run out of green paper in a kit!  I'm very surprised.  I've never had this happen before, and certainly not with the old Quill Art kits.  Fortunately I had one of those old kits around to raid, and found enough similar paper to continue.  It isn't perfect.  The color is just a smidge off, and the width isn't quite as narrow by half a millimeter, but given one thing and another, I think it will suffice.  I'm pretty picky.  I think all quillers are detail oriented by nature, so good enough is probably, well, good enough.

Kit is coming along - just three more to go - assuming
I now have enough paper ...
I was about half way through the herb kit when a friend visited and saw my completed berry sampler up on the wall in the kitchen.  She liked it, but it was when I showed her my still-in-progress herb sampler that her eyes really lit up.  She asked me to make her one, and said she'd pay for it.  I was (an am) a bit baffled as how to handle it.  I'm more than happy to make her one, although it may be a while before I manage to get through another entire sampler after 23 years of waiting :)  But more, it is the idea of selling this kind of work.  It is impossible to actually get the work value out of quilling, assuming you pay yourself an hourly rate that reflects your expertise at the craft.  Even say $20 an hour, which seems very low for such work, means I'd be charging hundreds of dollars for this piece.  I'm not going to ask a friend to pay that.  So what is the answer?  Ask for less?  Ask for nothing and give it away?  That last is certainly how I've dealt with this issue in the past.  It has always seemed strange to get paid for quilling.  How do you deal with this issue?

Form with filled quills for petals.
So I've placed a picture of the "Lovage" herb front and center on this post.  The Lovage is my favorite so far.  I really love the way the flowers look, with the graceful curls all the same size.  I did not use a mold or form to make these.  I simply eyeball the size, and get very consistent results.  I rarely use the forms and molds, since I find them sort of distracting.  Still, I did use them recently to create my "Pantone" flower, ensuring all the petals would have the same size, in spite of the different weights of the paper.  How about you, do you use forms, and when?

Image Credits:  My pictures of my own stuff, and my own work.  Herb Sampler kit is 1993 Malinda Johnston.

Sunday, January 24, 2016

Herb Sampler after Twenty Three Years

First pattern of twelve - Lemon Balm
As the title notes, I've had my kit for Malinda Johnston's "Herb Sampler" since the darn thing came out - 1993 I think.  Since that time I've fully intended to start (and then complete) the kit.  I've already done the Berry Sampler (completed in 1994).  I want to get the Herb Sampler framed in the same way, and hang them together in the kitchen.  Right now the Berry Sampler is quite lonely in there (and has been for twenty two years ...)

So this is the current '"Work in Progress" WIP as far as quilling goes.  I cracked open the kit and started work.  First of all it is interesting to feel the difference in papers between now and then.  Modern papers, at least in my experience, have a pretty consistent feel regardless of color.  But back then, papers seemed to vary pretty widely in texture depending on the color.  I don't know if that was an actual difference in the paper itself used for each color, or if the dye process changed the texture.  But it is pretty obvious when you run your fingertips over the strands of paper.

My framed Berry Sampler
The second thing ... It's been a long while since I've worked exclusively with very narrow width paper.  This stuff is a shade more narrow than 1/16".  Quite narrow.  And my fingers and hands are rather a bit more stiff than they used to be.  I used to love narrow paper for the lightweight, lacy effect.  I worked with it as much as standard 1/8" paper when I was a kid.  Well the years have made quite a difference, there.

Lastly, I'll mention it's fun to work from a kit again.  My last project was of my own design, and so each and every piece was unique, won't be repeated.  All my color and paper length decisions were made as I went along, along with part of the design.  It made the quilling very slow going, trying experiments (that often didn't work the first time through) and new techniques.  It was fun, yes, but sometimes frustrating.  A kit might be boring for some, given you just follow the lines, but it is a welcome break from the detailed process of design.  At least for the moment. 

I'll post some more updates as I go!

Image Credit - My pic of my own work, pattern Melinda Johnston 1993.


Tuesday, August 4, 2015

Ideas and Inspiration for New Quilling Projects

This iron-on book, mostly for use
as a source for embroidery patterns,
is also a great source for quilling ideas.
So you want to quill, and you don't know where to start.  Or maybe you've been at it a while and want some ideas for, well, finding new ideas.  Here is my list of places I go for inspiration.  Starting simple and easy with "kits" and ending with some more strange stuff like "fractals."  Hopefully you'll find something useful here!  Let me know if any of this works for you, and what your own unique ideas are for inspiration and imagination :)  !

Note:  If you use someone's pattern, or create a piece that is reasonably similar to theirs, then you should contact/acknowledge them if you end up posting pictures of that piece, or putting it up for sale, etc.  Kits, for example, are offered with the understanding that you might craft and then sell a piece exactly like it.  Permission isn't necessary in those cases.  But some art is utterly unique, and one should not take a copyright for granted.  When in doubt, ask the artist.  At the least, it is a common courtesy, and at the most it could be a legal requirement, depending on the specifics of your situation.

Quilling Kits:  The easiest place to start is to simply buy a good quilling kit.  There are several companies that make them, and they are relatively inexpensive.  (Some are listed on my sidebar.)  A quilling kit contains instructions and enough paper to complete a specific project.  Some are very basic, and others quite involved.  You can do the kit exactly as is, make your own adjustments and embellishments, or use it as inspiration for a completely different piece.

Some patterns are easy to adapt, just
start filling in with quills!
Patterns in Books:  Books about quilling generally have patterns for you to follow.  Books are more expensive than a single kit, and usually do not come with paper, so be sure you know what you are getting before you buy.  Some are for beginners, others are for the more advanced and do not have tutorials.  Many books follow a theme like "cards" or "flowers" so be sure the theme resonates with you.  Books often have great galleries of finished projects at the back that are great places to find inspiration.


Images of Quilling:  Need ideas?  It's time to just go browsing.  I can spend hours looking through places like "tumblr" or "pinterest."  There are no patterns of course, or step by step directions.  But it is a great way to spot new techniques, ways to blend colors, and more.  The best part is that browsing is free, except for all the time I spend doing it, anyway :)

Motifs and Designs:  There are resources that are specifically created to offer copyright free motifs, designs, borders, illustrations, and patterns around a theme.  Many of the motifs are bought to be used as clipart, sewing patterns, tattoo sources, and more - say quilling!  I'll be posting here on the site about a few of the motif resources I have to give you a better idea what I mean ...

Some patterns are a bit more complicated ... but
perfect for more involved projects.
Other Arts and Crafts:  This is a biggie.  Other arts and crafts can be excellent sources of ideas.  Quilting, embroidery, origami, beadwork, and so much more all have their own kits and patterns.  One may be just what you are looking for to adapt for a new quilling design.  And if you are also practicing that other craft, you may find innovative ways to combine them into something extraordinary.  Quilling and sculpture, for example, are perfect partners for amazing paper art in three dimensions.  My personal favorite craft to keep an eye on is stained glass!  Gorgeous colors and clear designs are the hallmark of that craft, and they are often easily exported to quilling. But not to be overlooked are more unusual art sources, say fractal art.  A place like deviantArt.com has plenty of great pieces to spark your imagination.  Fractals already are a basic aspect of nature, so their repetition can fit in very well with quilled designs.

Nature:  The biggest biggie, really.  I can't draw very well, so I use my camera and take pictures of whatever I find compelling in the world.  Using my quiller's eye, I see things very differently than when I'm just randomly enjoying a simple walk.  Sometimes an image breaks down into a pattern hardly without trying, and other times its a struggle.  But like any artist, if you want to capture something amazing to share, sometimes there is no other way than the hard way!

What are your sources of inspiration for quilling?

Image Credits:  From the Butterfly Iron on Book by Barbara Christopher, sitting on my shelf.