Sunday, January 21, 2018

Basic Snowflakes - Patterns for Beginners

Snowflake #2 - Only four different kinds
of shapes are needed to create this
colorful snowflake - detailed pattern for
this flake to be posted soon on Craftsy.
As I mentioned in previous posts, I've taught some workshops recently for beginning quillers.  To support those workshops, I created a couple of patterns for easy snowflakes using just basic shapes.  I'm going to generate some nice write-ups for these and post them for free on Craftsy.  I'll let you know when I do that.  But in the meantime, what with all this snow so far this winter, I thought I'd put the general writeup for the first and easiest snowflake pattern right here.

Snowflake #1 - You will need:
  • Paper Strips – 12 strips of paper, each 8 inches long.
  • White craft glue.
  • Wax paper is good to have, but not necessary.
  • A toothpick can help apply tiny dabs of glue.
  • A quilling tool or toothpick if that’s how you like to roll up your paper quills.

Step One: Get Ready

Work on a flat surface where you can leave your quilling overnight to dry.  If you have it, put a piece of wax paper over the pattern (Snowflake #1 - Pattern, below).  As you make your quills, you can arrange them right over the pattern.  Put your paper strips and glue nearby.

Loose coil shape.  Diamond shape.  Teardrop shape.
Step Two: Make Quills 

Snowflake #1 pattern requires:

- Six (6) Diamond Shapes, any color you like.
- Six (6) Teardrop Shapes, any color you like.

To begin, check out the paper quilling tutorial on Craftsy to learn how to start quilling.  It shows the initial steps, and then how to make basic shapes.  You will want to start by making a loose coil shape, and then pinching it to create one of the two other shapes shown here.  Practice making these shapes until you like what you see.  Then to create Snowflake #1, make six diamond shapes and six teardrop shapes.

Snowflake #1 - Pattern
Your shapes may be bigger or smaller than those in this pattern, depending on if you quill with your fingers or a quilling tool, and how big you let your quills expand before you glue them.  It’s okay if your quills are a different size, just use the pattern as a guide.

Step Three: Arrange and Glue Quills:

Following the pattern, take the six diamond shapes and glue them together to form what looks like a six pointed star.  Give this a few minutes to dry.   Then take the six teardrop shapes and glue them to the star with the points facing outwards.

Step Four: Finish

Let the snowflake dry overnight. Remove it carefully from the background, since if you used a bit too much glue, it may stick.  Then use some string or ribbon to hang!

Image Credits: Snowflakes, my pix of my own snowflakes. Close-up of loos coil, diamond, and teardrop shapes used from http://www.naqg.org/accreditation/NAQGshapeChartFinal2010.pdf

Saturday, January 13, 2018

Quilling Workshop - UUCC Women's Retreat

Smiling with my quilling
supplies at hand.
There was a buzz of happy conversation during registration for the Unitarian Universalist Congregation of Columbia's (UUCC) Women's Retreat this January 6th.  We hadn't had a woman's retreat in over a year, and this one-day mini-re"treat" was indeed a treat.

I was excited and honored that my quilling workshop was selected as part of the program!  As I noted in a previous post, at the last women's retreat I quilled my name tag.  This tag started all sorts of conversations, including one that suggested I should teach quilling at the next retreat.  It was really gratifying to see that idea come to fruition.

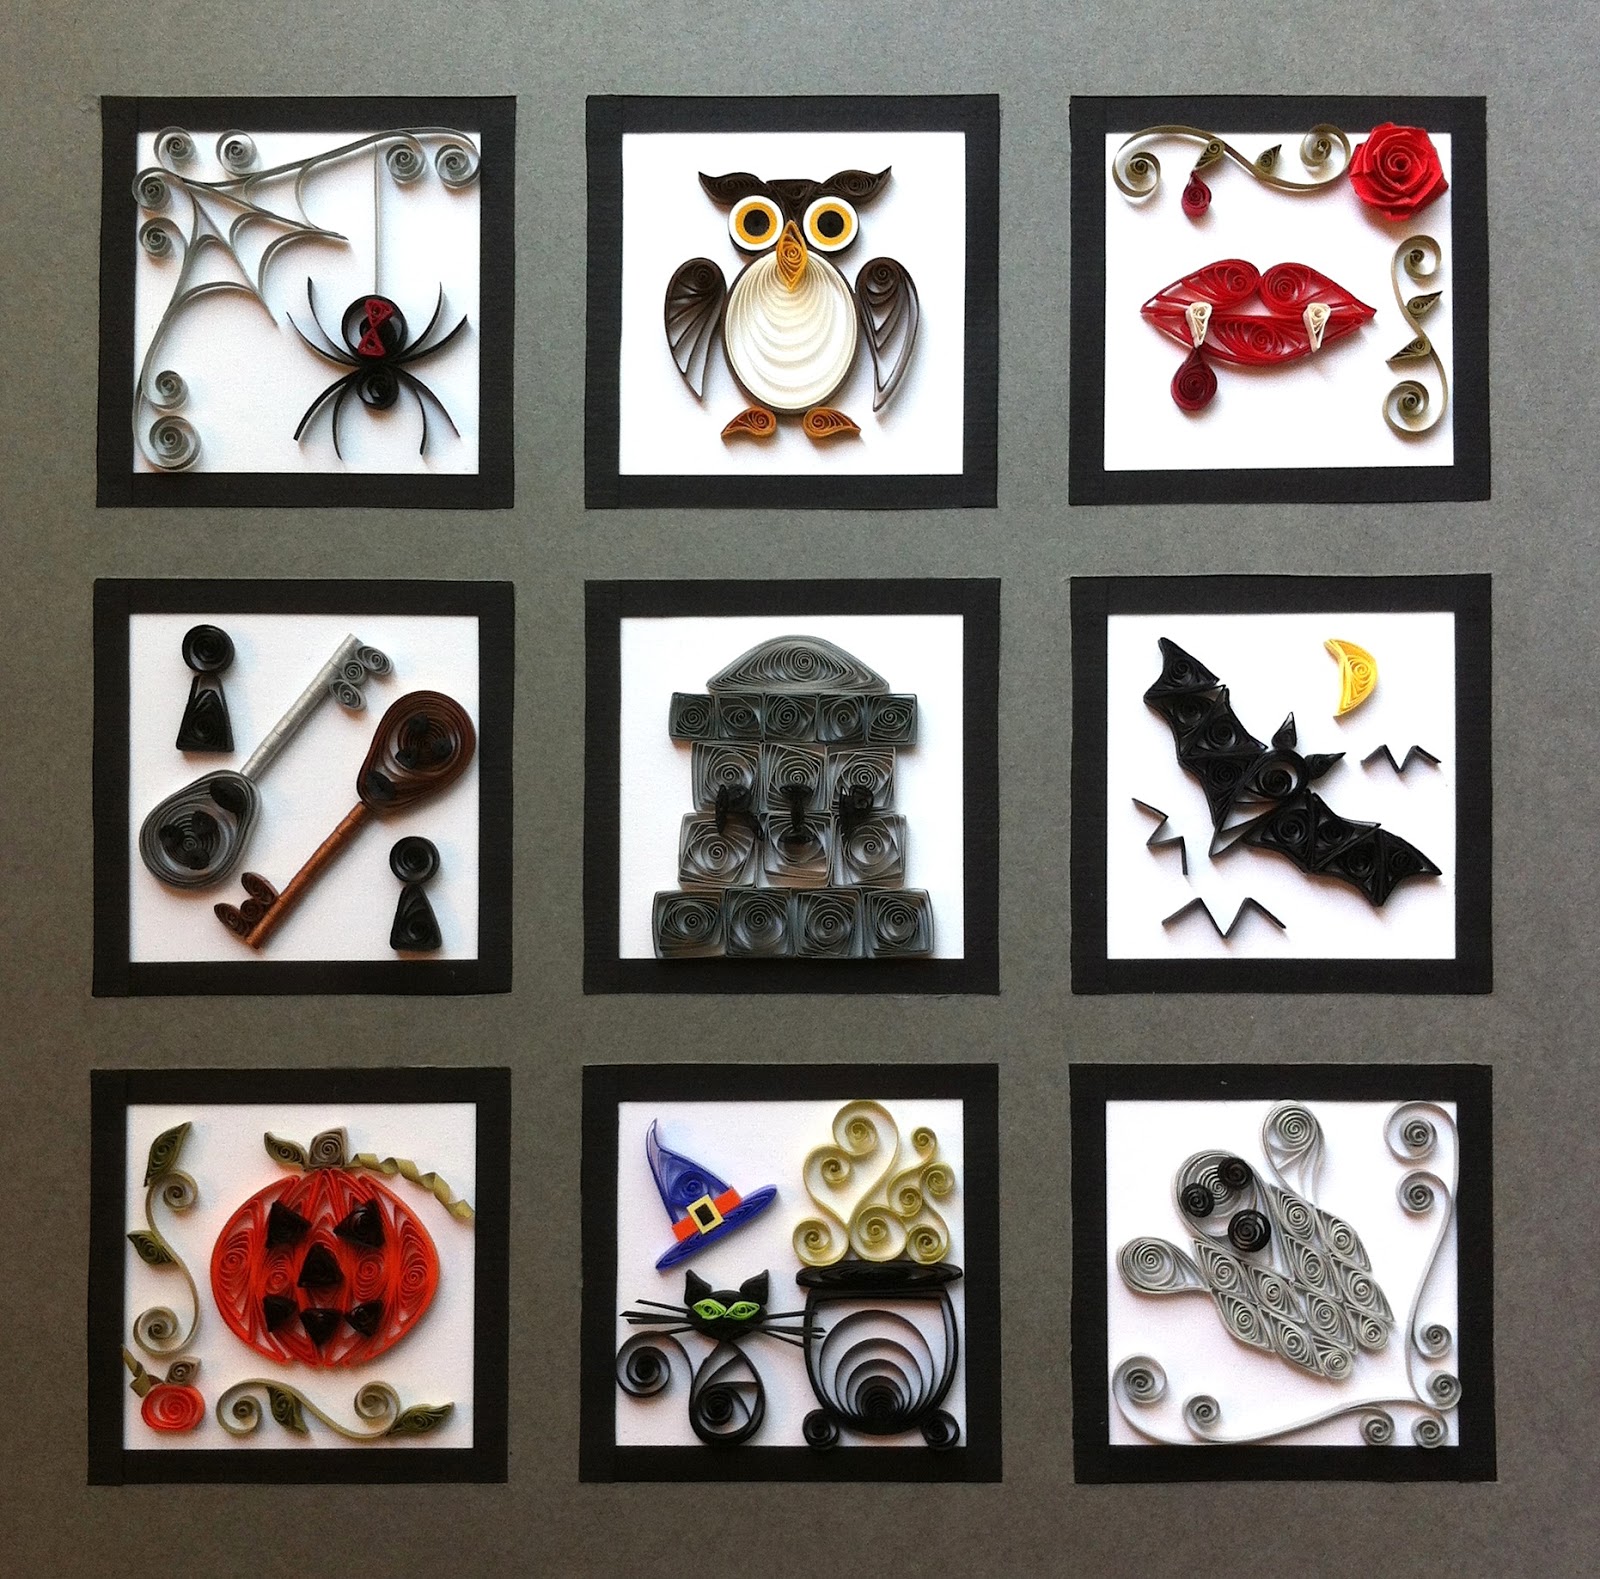
Now, I had taught a quilling workshop just the week before to children aged 5-12.  It went wonderfully, but all my materials were in a happy mess.  I had to scramble to get myself organized for the Jan 6th retreat.  With organization mostly achieved, I packed 15 of my 50 quilling books into my rolling craft carrier, along with tools, paper, patterns, glue and all the rest.  I included some of my actual quilling, like my Halloween Sampler, Spiral Moon, and Berry Sampler.

Discussing quilling designs with artist
Carol Zika.  The books were a great way
to introduce the world of quilling.
Everyone found something to inspire them.
The room filled with the 20 people who had scheduled for the workshop.  I was prepared with a pile of tools and paper (thanks muchly to Quilled Creations and their teacher discount!) so everyone had their own to work with.  We started with introductions, and then I spent time passing around my quilling examples as well as quilling books so everyone would have a chance to see all the amazing things that are possible with nothing more than paper and glue.

Then we got deep into the paper, with everyone practicing how to form the basic loose coil.  As it happens, I don't quill with a tool; I've been using my fingers alone for decades.  I only use a needle tool in some specific circumstances.  Many of my quillers with stiffer hands and arthritis found the slotted tool to be the most user-friendly way to quill.  Some quillers preferred the fingers-only approach. 

I find this is a very important point in a workshop, because an experienced quiller makes things look easy, and for first timers quilling can be tricky.  When their first coils don't look like mine, I always see some frustration.  So I provide a lot of encouragement and coaching at this point, trying to get people to adjust to the fact that their initial attempts might not be as perfect as they had hoped.  Quilling, like any craft, gets easier the more you do it.  The group was having fun, and was very motivated, so collective frustration didn't last long.

Here I am demonstrating my personal
take on the finger quilling technique.
I handed out sheets with various shapes (thanks here to the NAQG formal list of shapes and names) and we made teardrops, squares, triangles, eyes, and more.  By this time some of the quillers were off - seeing things in the books they wanted to try and just going for it.  Others spent more time quilling the basic shapes, trying to hone their technique.

By the end of our time, everyone had at least some quilled shapes to take home, while others had used the cards I provided to make some pretty substantial designs.  I was able to hand out extra paper to everyone, and even some tools to those who wanted to use them.  I also gave everyone a three page handout I had prepared that included: information about quilling, instructions on making the basic shapes, and free snowflake patterns I designed using those shapes.  It also included my contact information.  It was really nice to get two emails the very next day from people who said they had a great time, and wanted to continue to quill!

I had a great time sharing something I have loved since I was nine years old (which means 40 years of quilling, yikes!)  It was also wonderful to have some more time to connect with the women at UUCC.  I'm looking forward to our retreat this fall in early December!

Images:  Pics using my camera taken by workshop attendee.  Carol Zika's face and name appear with her permission.

Sunday, January 7, 2018

Creative Endeavors: A Bit of Bread

After quite the blogging hiatus here, I'm back with lots to share!  Last year was filled with all sorts of unscheduled fun like multiple bouts of the flu and a couple family medical crises (thankfully all resolved in a good way.)  And then there's that textbook that has been taking up all of my spare writing time ... but that's well in hand (finally) and it's time to get back into the blogging habit for 2018.  I've already done two quilling workshops in the last 10 days, and I'm excited to let you in on all that happened!

But first ...

I couldn't resist blogging about this loaf of bread.  I know, it isn't quilling or jewelry, but I consider bread to be a highly creative (and unpredictable) endeavor, so here it is.

I spotted this bread mix in a store.  "Soberdough" which it certainly isn't.  I normally stay well away from making real bread - I can't get it to rise; I think I might be a witch.  But anyway, this one said, "Just Add Beer" and I couldn't resist.  Since it was cinnamon swirl bread I used a bottle of Angry Orchard Cinnful Apple Hard Cider instead of beer.  Mixed it up as directed.  It said "pour" into bread pan but mine sort of "plopped."

Still, it made the house smell great while it was baking.  I pulled it out, let it cool, and lo and behold, a loaf of bread.  It sort of has a consistency somewhere in the middle of the muffin-bread-cake ternary diagram.  Flavor is not bad at all.  Had some for tea today, and it was very nice.

The real test?  Let's see if it makes good french toast tomorrow!

Sunday, November 27, 2016

Touching a Legacy and a Tiny Mystery

A fantastic book - a favorite
I've already reviewed here
on the blog.
I was very saddened to learn today that quiller Malinda Johnston passed away just a few days ago, on Thanksgiving, November 24, 2016.  I was one of a huge number of quillers that found her work to be inspiring.  Her books simply made me want to quill, and then they did a great job of showing you just how to do it.  She has left behind an incredible legacy that will positively impact paper quilling and quillers for many years to come.

I've already reviewed her book "The Book of Paper Quilling: Techniques and Projects for Paper Filigree" here on this blog.  It will always be a favorite.  I remember opening up the book and flipping through the designs for the first time.  I was particularly impressed by the Halloween design (after seeing me post my own Halloween Sampler here on the blog, I'm sure you are not surprised by this.)  The little pumpkin on that page is so perfectly made, and the swirls in the ghost show impeccable technique.  I decided that no pumpkin could possibly be better than that one, and have rather consciously tried to meet that standard on every pumpkin I've quilled since.

And then years later ...

Pages 78 and 79 of the book, showing the little pumpkin
that I became somewhat obsessed over.
I blogged about attending the North American Quilling Guild Conference that happened in May of this year.  One of the things I didn't mention was that at that meeting, everyone had the chance to walk away with a piece of quilling history.  A number of older pieces of quilling had been contributed to the guild, and we were all given the chance to pick one out for our very own.  I didn't know this until late in the meeting, and so by the time I got to the display there weren't many left.  I walked down the table ... and couldn't believe my eyes.  There was the pumpkin!  The ghost!  And I was able to take them home for my very own!  They are a bit worse for wear over the years, but I am thrilled to have them in my collection.

Actual in-my-hard art is
above, and the book's
image is below.
So that is me with a small touch of a great legacy.  So what is the tiny mystery, here?  It is this - the question of who quilled this piece is not easily answered.  You'd think it would be easy, because on the back of the piece there is a post-it note saying "Designed by Eleanor Baxter for LCC Book of Paper Quilling pg. 79."  But.  When you read the acknowledgements in the back of the book, Eleanor Baxter is credited with the Valentine Heart, also shown on page 79.  (see picture of two page spread, above.)  In fact, no one in the acknowledgements is credited with the Halloween design.  So I'm wondering, did Malinda do this herself, and did the post it note get moved to the back of the wrong project?  Or was there a mistake in the acknowledgements for the book? 

Another picture of book with
quilled art.  Love it.
I suppose I might never know the answer to those questions.  It does not matter to me from one perspective - that I now own this awesome piece of quilling that has always meant something to me.  But it does matter to me because I'd love to give credit where it is due.  In any case, Malinda Johnston created a great book that included this and many other wonderful designs.  And she did a great deal more for quillers everywhere.  I still look forward to quilling designs from Lake City Crafts.

Image Credits:  My pictures of books and quilling that I own.  The Halloween design?  Well, it appears in the book, and could be from either Malinda Johnston or Eleanor Baxter.

Wednesday, November 16, 2016

What a little quilled name tag can do ...

I spent last weekend at a women's retreat organized by my church.  It ended up being a wonderful time, but I started the weekend not knowing anyone at all.  I was concerned that, what with having social anxiety, I'd be afraid to meet anyone, and would spend the time alone.

Still, I went to the event with an open mind and lots of hope to meet other local women and perhaps start some new friendships.  I noticed on the agenda that one of the first things we were going to do was "Make Your Own Name Tag" so naturally I brought along my travel quilling kit with some extra cardstock.

The name itself had been provided for us, so all I had to do was pick some pretty paper, glue things together, and then do a bit of quilling.  I chose something simple because I was nervous, and because I wanted to be sure the glue had time to dry before I put the tag on.  Flowers, can't go wrong. 

The first thing that happened was that the array of colors of the quilling paper attracted some attention. "What is that?" one woman asked, and of course I was thrilled to give a quick quilling demonstration.  Another woman walked over and said, "Oh, my mom used to do that!  I forget what it's called."  And so a different conversation got started.  By the end of name-tag-making-time, I had several people sitting around me, talking, making tags, and asking to use some of my supplies.  It was great.

The rest of the weekend people kept coming up to me and remarking on my name tag.  It was absolutely the best conversation starter.  I had no idea it would attract so much attention, but was glad that it did - I met so many wonderful people that I probably would have been too shy to approach myself.  At the end weekend one of the organizers said I should consider doing a quilling workshop for the next year's retreat!  I certainly hope I can say yes to that request - I'll have to see what my schedule holds, but it was so nice to be asked.

I will certainly be quilling more things like name tags in the future.  It turns out to be the perfect way to get a conversation going and to meet new people!

Image Credit:  My pic of my own nametag, my quilling and design.

Monday, October 31, 2016

Halloween Sampler - Projects #8 and #9

This is the last post for the Halloween Sampler!  Finally ... I hope these instructions are of some use, and that you have fun making a few of these little projects, or the whole sampler!

I particularly hope you have fun with the projects that are a little more unusual - there are lots of patterns for pumpkins, but vampire fangs and skeleton keys are a little more hard to find.

This post covers projects #8 and #9 (out of nine).  I've already posted the general instructions, the mat board cutting instructions, as well as projects #1 - #7 and a bonus project!

First post -  Halloween Sampler
Second post - General Instructions and Mat board
Third post - Bonus Project and Project #1
Fourth post - Projects #2 and #3
Fifth post - Projects #4 and #5 
Sixth post - Projects #6 and #7 
Seventh (and last) post is this one! - Projects #8 and #9

And remember, if you want to download all the instructions right now in one go, then head over to Craftsy where I have them posted for $3.99.

Project #8:  Vampire Fangs

Materials:
Mouth
- bright red, 2 strips at 8” (upper lip)
- bright red, 1 strip at 12” (lower lip)
- bright white, 2 strips at 3” (fangs)
- dark red, 1 strip at 6” (blood drop)
Thorny Rose Vines
- bright red, 1 strip at 12” (rose) 1/4” wide strip
- olive green, 2 strips at 5” (vines)
- olive green, 4 strips at 2.5” (thorns)
- dark red, 1 strip at 3” (blood drop)

Start by using 2 of the 8" bright red strips.  Make two long teardrops.  Make a long, flat semi-circle with the 12" strip.  Glue these three pieces together as shown to form lips.  Form fangs by taking the 2, 3” strips of white and making long triangles.  Glue these on top of the lower lip.  Make a teardrop out of the 6” dark red strip, and glue it to the lower lip so it appears to be dripping off of one of the fangs.

Make a rose from the 12” strip of 1/4" wide paper.  Make two long “S” coil shapes from the 5” olive green strips.  On each of these “S” shapes, glue two thorns.  The thorns are long triangle shapes made from the 2.5” long strips of olive green.  For a final touch, create a small teardrop shape from the 3” dark red strip and position it so it drips from one of the thorns.

The fangs and thorny vines are found in the upper right square of the sampler.  Glue the pieces into place there, the square in the top, right column.

Project #9:  Witch’s Lair

Materials:
Hat
- bright purple, 2 strips at 10” (hat)
- orange, 1 strip at 1.5” (sash)
- yellow, 1 strip at 1” (buckle) ¼ wide paper
- black, 1 strip at 1/8” (buckle)
Cat
- black, 1 strip at 9” (body)
- black, 1 strip at 5” (head)
- black, 1 strip at 4” (tail)
- black, 1 strip at 2” (whiskers)
- black, 1 strip at 2” (nose) 1/8” narrow paper
- black, 2 strips at 2” (ears)
- neon green, 2 strips at 1.5” (eyes)
Caldron
- black, 1 strip at 25” (pot)
- black, 1 strip at 12” (lip of pot)
- black, 2 strips at 3” (feet of pot)
- green/yellow, 4 strips; 5”, 4”, 3”, 2” (poison fumes)

To make the witch’s hat, start with a 10” strip of bright purple and form it into a long triangle, with the tip slightly bent.  Make a circle out of the other 10” strip and squash it flat to form the brim of the hat.  Glue together.

Use the strip of orange and wrap it around the bottom of the hat just above the brim.  It should go across the front and down both sides of the hat (but not around the back).  Trim the strip to fit if necessary. 

To make the buckle use the bit of 1” yellow wide width paper, cut a small rectangle.  Use the black paper to cut an even smaller rectangle, as shown.  Glue the black rectangle onto the yellow one.  Now glue this onto the hat, on top of the strip of orange.  (You can also make a nice hat from other colors, such as black and dark green, and use strips of different colors as well for the sash.)

The cat’s body is made from a wide teardrop formed from the 9” long strip of black paper.  The 5” strip should be formed into an eye shape and glued on top of the teardrop.  Use the 4” length of black to form a tail, curving and trimming into whatever shape pleases you.  Make two ears by making long triangles from the 2” strips of black paper.  An image of the back of the finished cat is shown.

The face is more detailed, and getting a good picture was hard.  First, make two eye shapes from the neon green, and glue them to the upper part of the head, just under the ears.  Now take the 2” strip of black and use the scissors to cut it lengthwise into 4 very narrow strips.  Center these under the cat’s eyes, and fan them out a bit to look like whiskers.  Glue into place one at a time, right on top of one another.  Just use one tiny dab of glue at a time, and then put another whisker down, and glue that.  On top of the center of the whiskers, you will put the nose.  The nose is a triangle made from the 2” strip of narrow black (although regular width would work fine, using narrow width paper here helps to keep the nose from poking out, and hides the middle of the pile of whiskers where you glued them in place.)  Glue the nose.  Trim the whiskers to be the right length for your project.  (mine stick out about ½ to ¼ of an inch from the nose on either side).

The boiling caldron starts with the 25” strip of black, rolled into an offset-circle.  Put the center of the offset at the bottom, and flatten the top of the circle to be the top of the pot.  Use the 12” strip to form a circle, and squash it flat to make up the brim of the pot.  Glue in place.  The feet of the pot are made from the 2, 3” strips made into circles.  Glue to the pot.

The poisonous fumes are made from four pieces of yellow/green paper of various lengths.  Each is made into an “S” Shape and glued to the top of the pot, and to each other wherever they touch.  I used 5”, 4”, 3”, and 2” length strips.

Arrange the hat, cat, and caldron in the lower, middle square.  Glue into place in the middle column, bottom, as shown.

Image Credit:  All my own pictures of my own quilling, all my own original designs.


Halloween Sampler - Projects #6 and #7

Right, I had said in August that I'd get all these sampler instructions up by Halloween.  Well, that's today, and I still have instructions to put up.  So I'm just going to get these two posts up right now, and get this done once and for all :) Still my excuse was all the work I was doing on my "Spiral Moon" project, which as the Moon is also vaguely Halloween-y.

This post covers projects #6 and #7 (out of nine).  I've already posted the general instructions, the mat board cutting instructions, as well as projects #1 - #5 and a bonus project!

First post -  Halloween Sampler
Second post - General Instructions and Mat board
Third post - Bonus Project and Project #1
Fourth post - Projects #2 and #3
Fifth post - Projects #4 and #5 

And remember, if you want to download all the instructions right now in one go, then head over to Craftsy where I have them posted for $3.99.

Project #6: Black Widow Spider

Materials:
Web
- grey, 4 strips at 5” (web top and bottom)
- grey, 1 strip at 3” (web strands)
- grey, 3 strips at ¾” (web)
- grey, 3 strips at 1” (web)
- grey, 1 strip at 2” (strand from spider)
Spider
- black, 1 strip at 4” (head)
- black, 1 strip at 7” (body)
- black, 4 strips at 2” (legs)
- bright red, 2 strips at 2.5” (hourglass)

Web:  The web is made of grey strips.  First, take two 5" strips and make long 'S' shapes.  Glue together to form the ‘side’ of the web.  Make two more long “S” shapes and glue these together for the ‘top’ of the web.  Glue these two sets together where they touch.  Take the 3" long strip and fold it into a 'V' shape.  Place it inside the long “S” shapes and glue into place.  This forms the long, straight structure of the interior of the web. 

The cross webs are each a separate bit of paper, slightly curved.  Inside are three .75" strips, and outside are three 1" strips.  Slide them in-between the “V” and “S” shapes, and carefully glue the ends in place.  I found tweezers to be very helpful when doing this.
 
Then the spider.  The head is a 4" strip of black, and the body is a 7" strip of black, both formed into circles.  Before gluing them together, take 4, 2" strips of black and glue them flat between the head and body, one at a time.  When dry, curve these to form legs, and trim the length as necessary to fit your project. (I wanted my spider legs to be really long, but I had to trim them up to get the spider to fit in the box.)

Take 2, 1.5 inch strips of bright red and form them into triangles.  Glue together at the tip to form an hourglass shape.  When dry, glue this onto the body of the spider. 

Last, take a strip about 2" long of the grey, and attach it to the spider's body.  Attach the other end to the top of the web, trimming as necessary to fit your project.

The black widow can be found in the first box of the project.  Glue the pieces together in the first column, left, top box.

Project #7:  Skeleton Keys

Materials:
Silver Skeleton Key
- silver metallic, 1 strip 20” (skull)
- silver metallic, 10 strips at 1.5” (barrel)
- silver metallic, 2 strips at 2” (long tines)
- silver metallic, 1 strip 1.5” (short tine)
- black, 2 strips at 2” (eyes) 1/16” narrow width
- black, 1 strip at 2.5” (nose) 1/16” narrow width
- black 1 strip at 3” (mouth) 1/16” narrow width
Bronze Skeleton Key
Same as above, except using bronze metallic paper.
Keyholes
- black, 2 strips 4” long
- black, 2 strips 6” long

Start with a 20" strip of metallic silver.  Shape it into a 'pear'.  This is the skull of the skeleton (the top of the key). The barrel of the key is made with 10, 1.5" strips of silver metallic paper.  Form each strip into a tight circle.  (You might need 2" pieces of you don't wind around a needle tool like I do.)  Stack the tight circles and glue them in place in a long line, with all the ends of the strips lining up together (that way you can hide them under the key).  The final three pieces making up the tines of the key are 2 rectangles of 2" paper and one circle of 1.5" paper.  Glue pieces together as shown.

The picture shows the backs of the keys, where I tried to show how the paper ends of all the tight circles all line up along the back of the barrel (but I could have done a better job with my own keys :).  Repeat the whole process with bronze metallic paper for a second key.

The face is made from 2, 2" strips of black in closed circles for eyes, a 2.5" strip in black in a triangle for a nose, and a 3" strip in a long oval or rectangle for a mouth.  These were 1/16" narrow width paper, but you can use 1/8" for the face and it will work fine.  Make two sets of these.  Make sure you are now working with the TOP of your key (lines on the barrel are now down against the work surface) and glue your faces in place.  This picture is a bit over-exposed, but it shows the faces well.

To finish the project, make two keyholes.  Use the black 4” strips to make circles, and the black 6” strips to make long triangles.  Flatten the tops of the triangles slightly.  Glue the circles on the tops of the triangles.

Display your keys and the keyholes together in the sampler.  Glue them into the square in the middle of the left (first) column.

Image Credits:  All my own pix of my own qulling, my original designs

Friday, October 7, 2016

Quilled Moon Won Second Place!

Happy framed full Moon!
Wow!  OMG!  I am thrilled, humbled and honored to have tied for second place in the Little Circles Quilling contest for this year!  The newsletter from Little Circles with the announcement of the winners is here.

My piece "Spiral Moon" (that I've been blogging about here) was selected based on number of likes, originality, creativity, and technique.  There were so many really outstanding pieces in the 64 piece lineup, that I really am surprised to have earned a 2nd place finish.  Thanks to everyone who encouraged me while I was working on this piece, and who liked the picture on Facebook - both gave me the boost I needed to have a winning work of art!

The art will get a bit more exposure, too, because it is going to be exhibited as part of The Art of Planetary Science that will be offered at this year's DPS/EPSC meeting in Pasadena.  So I'll get to see what the science community has to say about it, too  :)

I hope you enjoyed following along as the piece took shape!  I'll blog more about the exploits of 'Spiral Moon' as they occur!

Image Credits:  All my pix of my original art.

Friday, September 16, 2016

Quilling the Moon: Highlands and Maria

Moon - over half completed!
Highlands regions carefully
constructed to be filled in
later with 'mare' material.
As I mentioned in my first "Quilling the Moon" post, the highlands are the bright, mountainous areas of the Moon, while the mare regions (maria, plural) are the dark, flat, volcanic plains of the Moon.  I also mentioned along the way that since the mare were being filled in with nearly black paper, I needed daylight to do that work.  So I ended up working nights on the light highlands and leaving holes behind to be filled up with dark paper during the day.  It was an interesting way to approach the project, since I had to be constantly planning several steps ahead as to how the regions would look once they were completed.

Moon - Maria filled in!
Again, the color choice was really critical, and took a great deal of time.  I wanted to be sure the smaller, bright craters were consistently marked with the bright white paper, and that the intermediate areas were marked with the darker grey, leaving the bone white for the overall highlands material.  Creating the mare boundaries was also a challenge because I needed to ensure that the quills fit together nicely, with the sizes varying in a pleasing random sort of way.

Close-up of filled maria.
Going back and filling in the mare was very gratifying, since it made me feel like I was making a ton of progress.  But this was where the sizes of the quills really made a big difference.  Being constrained by the small areas, I had to be very careful and clever about how each quill fit next to its neighbor.  Some of the quills in this project are made from paper less than 1/4" in length, and so were pretty challenging to make and to fit into the tiny spaces they needed to occupy.  I remember doing work like this is a child, and the 'smallness' of the quills not being nearly so difficult for both fingers and eyes!

Image Credits:  My pix of my own quilling, my design!

Sunday, September 11, 2016

Quilling the Moon: Progress in the South

Some progress!
Even more progress!
As of this moment, I've finally completed my Moon, but I want to post some of the intermediate pictures to show the progress.  So I'll be finishing up the Moon blogging in another post or so.  But for now, compare the two images here and you can see how the edge of the Procellarum basin expanded towards the center of the image, and how the highlands were filled in from the right.

The mare sections at the top and left of Copernicus crater were really challenging.  As I approached the bottom of the Imbrium basin, I got more and more nervous about exactly how the basins would 'express' themselves.  I wanted them to be bold and easily recognized, but didn't want to lose the subtlety of the interesting margins, and of the craters and their ejecta.  So I moved very carefully, filling in the area to ensure that the basin would have an obvious round edge to it, but also ensuring that all the important tiny features could still be seen.

Close up of the area around
Copernicus.
Looking at the close up image makes this all seem so straightforward and easy!  But since every single quill was created on the fly - size, color, and placement - it was really very difficult.  But I do like the general effect.  It is certainly the Moon, and it has a strong mosaic look without losing the lacy feel that quilling offers.

What I'm starting to worry about now is how to hide the errors I'm spotting.  Like how my Moon is not a perfect circle anymore.  Pressure from the different areas as I glued them in place slowly altered the nature of the outline - it isn't quite a perfect circle.  I can see flatter areas, and areas with slight bulges.  Not sure how to hide this - I was already planning to put mat board around the outline, so perhaps this will make the project look more even.

Image Credits - My pix of my own quilling, my design!

Friday, September 2, 2016

Quilling the Moon: The Edge of Procellarum and Some Lessons

The first portion is filled in.
Here's some progress on my quilled Moon!  I filled in the areas of the highlands and the edge of the mare on the south eastern portion of the Moon.  Many lessons were learned during this initial phase of the project, and I'm sure I'll be going back to this section when it is all finished, and thinking, oh yeah, could have done that bit better.  But there is always room for improvement on any project, and if you wait for perfection, you get nothing!

Color choice - very tricky.
One lesson I learned is that I need better quilling lighting.  Working with dark paper in anything less than bright light is a chore.  It is too hard to see if the quills are nicely coiled, and to determine the perfect sizes to fit together in the mare regions.  So the lesson was twofold - buy a lamp, and also, only work on the mare regions during the daytime!  Another lesson, one I knew but had to have reinforced, was use the tiniest amounts of glue possible.  It really shows up in the dark regions, and I had to take out and redo some sections just to eliminate small glue spots I couldn't get rid of with my tweezers. 

I had no idea that only working with four colors could make color choice so difficult.  But it is.  Each and every one of these quills is an agony of choice.  The regions at the edge of bright/dark regions are particularly challenging.  How and at what point does the gradation start?  Some of the margins were easy, since they were very 'digital' - one side bright and the other dark.  But the messy grey regions ... very challenging.  I spent a lot of time making decisions between what met my artistic vision, and what was the most scientifically accurate.

One of the greatest challenges was the quilling around Copernicus crater, the larger bright crater on the right side of this image.  But I'll talk more about that next time!

Image Credits:  My pix of my own quilling!

Monday, August 29, 2016

Quilling Supplies: Little Circles

I put in a few orders recently to various suppliers to bump up my quilling inventory (including adding some books to my collection).  My Little Circles order arrived not a moment too soon, as they say!

I realized pretty quickly that I had not ordered enough paper for my quilled Moon, and put an order in for the two colors I was sure to run out of, the colors for the mare (Feathered Fedora) and the highlands (Fish Scales).  I also decided I'd do a bit of a review of Little Circles Paper in the future - like I did with Quilled Creations earlier this month.  So I put an order in for the paper sampler so I could play with it and add that knowledge to my review.  I also just love to have gorgeous rainbow samplers in my supplies.  So pretty.

I was curious about their new line of paper, 'On Edge.'  This is heavier weight paper, like card stock, that is designed to be used for outlining.  Outlining and paper line art has become very popular, especially for outlining letters in typography style pieces.  So I thought I'd give it a shot and see how it worked.  I bought one pack of the white 'On Edge' to play around with.  Plus I bought some tools - these are bamboo 'dowels' of various diameters that can be used in a variety of ways.  I've purchased them to help me make flower petals and such.  Last, there was a nice variety pack of extra paper added to the shipment as a free bonus.  Nice!

Keep your eyes on the blog for my upcoming review of how the Little Circles paper worked out for me.

Image Credit - My picture of my new quilling stuff from Little Circles. 

Saturday, August 27, 2016

Quilling the Moon: Beginning the Design

Deep breath - start quilling.
As noted in my previous post on the topic, I made a few decisions, like size and color choices, about my Moon.  And then started in ... with more thinking ...

Experiment with some circles,
add some rays to craters.
Armed with only four colors, I considered the Moon.  How would the design look?  Too many options.  I tried a few things, big swirls say, which did not work because there just wasn't enough detail.  Teardrop shapes.  Also did not work because there are too many really small circular features I couldn't depict that way.  I considered the fact that I study impact craters as a scientist, and then I made my choice.  Circles.  Tiny circles.  I'd do the whole thing in circles - not all the same size, since that would look too mechanical, and maybe too much like cross stitch or something.  Nope, I'd vary the size but have no circles with paper longer than about 4.5 inches.  And since I roll my paper pretty tight, that's a small circle.  Most of the Moon would be done with paper in the 2 inch length zone.

Tycho and the Southern Highlands
begin to take shape.
Right.  I also decided I wanted a subtle 'ray' effect for those craters that had rays.  After all, Tycho (the big light splash of a crater in the southern part of the Moon) would just not look the same without rays.  So I started out, putting up a few strips on their side to be the outline of the Moon, and the rays.  Then I started with Tycho, filling in just around the ejecta blanket of the crater in bright white, and out a bit into the highlands with the very light ivory and then some of the medium grey.  I liked the look, thank heavens, and so was inspired to keep on going!

Image Credits:  My pictures of my own quilling, my design.

Wednesday, August 24, 2016

Quilling the Moon: Starting Considerations

Beautiful full Moon - must quill.
I've been telling myself for many, many years that I should quill the Moon in some fashion or other.  The Moon is one of my very favorite objects - I am a lunar scientist after all, and have been studying the surface of that world since I started college thirty years ago.  Thirty years is a long time to have a Moon fixation, be a quiller, and not quill the Moon.

My motivation for doing this now is mostly to have a piece to display at an upcoming science conference in October that has a small space art exhibit associated with it.  And in addition, there is a yearly competition over at Little Circles for quilling that I'm planning to enter this into, as well.

So even though I am not quite finished with my herb sampler from earlier in the year, I am plowing into another project anyway.  Well, plowing might be a strong word.  The first things I'm doing are: taking a good look at a lot of data from the Moon, buying a bunch of grey paper, and pondering what the heck to do with it.

One of the big things I'm fighting as I make this Moon thingy is my need for scientific accuracy.  I have to balance this against design and artistic needs.  This isn't a photograph I'm making after all, this is a quilled piece whose purpose is to evoke the Moon in more of an emotional fashion.  But one can't just turn off being a scientist, so that tension is informing the entire piece.

I found a picture of the Moon that I liked from my many NASA interests, and chose to blow it up to about eight inches in diameter.  I wanted to make it small enough that I'd actually complete it before a decade went by, but big enough that I could portray the craters in enough detail for my scientific perfectionism.

Paper strips, 1/4" in shades of grey.
After doing that, I bought a pile of grey paper.  I'd never bought paper from Little Circles before, so I chose to buy all these colors from their Culture Pop quilling paper line.  I'll talk more about using Culture Pop specifically in another post.  The colors, from pitch black to bright white are:  Velvety Darkness, Feathered Fedora, Steel Guitar, Bottlenose Dolphin, Indoor Recess, Fish Scales, and Photographer's Umbrella.  I went with the quarter inch wide paper instead of the normal eighth inch paper because I wanted the Moon to have a more substantial feel to it.  More mosaic-y I guess.  More depth.

My first choice in color was not to make the dark regions of the Moon out of pitch black.  As you can see from the picture of the full Moon, the dark regions, that is the 'mare' (pronounced "mar-ay") are not as black as space.  But I did want a good contrast, so I chose a very dark grey, the Feathered Fedora, as my major mare color. 

For the highlands, the brighter areas of the Moon,  I wanted to make the rayed craters the only thing in bright white.  So that meant choosing another color for the bulk of the bright areas.  I had to pick between the sort of ivory-ish color and the mottled grey color.  In the end, I liked the sort of 'bone' look of the very light ivory (thinking about bones and how these areas have a lot of high calcium rocks), and went with 'Fish Scales.'  I also decided I didn't like the sort of mottled look of the quills made with Indoor Recess, so saved that paper for other projects.  I also chose not to use the Steel Guitar at all, because it has a blue undertone that did not mix well with the Fish Scales, at least in my view.  That left me with just one more color, Bottlenose Dolphin as my intermediate grey to fill in the odd areas that are either darker highlands, brighter mare, or mixed regions with no clear color choice.

Enough for now!

Image Credits:  Moon, NASA.  Strips, my quilling strips from my supplies, my pic.

Friday, August 19, 2016

Quilling Conference - NAQG, Day Two

Meeting Jane Jenkins!
It's past time to wrap up my visit way back in May to the NAQG conference in Nashville!  My first post on day one can be found here.

Weaving - Harder than It Looks.
Day two opened with a weaving class.  I've not done much but the most elementary weaving in the past, so this was very interesting for me.  I enjoyed the class, especially meeting Quilling illuminary Jane Jenkins!  Still, I don't think I'm going to be doing a lot of weaving in the future - not because I don't like it - but because I don't like pins!  So many pins!  I really don't enjoy keeping track of all those sharp bits of metal around my craft area.  Seriously, that's just one of my issues.  Every single line has two pins to hold it down.  If I'm going to be weaving, I need to find a new way to secure strips for the process.

My gifted quilled elephant!
Cards and gift tags I made in free time.
I spent the late morning and early afternoon in free quilling.  Just sitting around with other quillers and having fun.  I quilled some cards, name tags, and more, while new friends quilled other marvels.  One of which was a wonderful quilled elephant with dragonflies!  I loved it immediately, and was thrilled and humbled when the artist presented it to me to have, for my very own!  We also saw a few people from the general public come in, and they stopped by our table very briefly.  But we were no match for the draw that Jane and her husband Paul were making at a nearby table, quilling 'fluffy' teddy bears.

Buddha under Bodhi Tree
I spent some time wandering through the competition/display room.  This is a room where both competition and general display items were available for attendees to check out.  Any registrants for the conference could ask to have some portion of a table set aside to display some of their work.  And of course various competition categories also had work on display (although without names.)  This made it a little difficult to figure out who did what piece of work.  My favorite, a Buddha, was done by an artist whose name I still don't know!  That was one of the points of the competition that was a little frustrating - since winners were announced at the last minute at the banquet, one never really got a chance to find out who did what piece of art.

The evening entertainment was live music and a banquet.  We had a wonderful time together, listening to local music and enjoying the raffle.  I really enjoyed watching my table-mates root for one another as various pieces in the raffle came up.  Many classic pieces of quilling were donated for the raffle, and were given as gifts for each one of us!  These quillers were very generous.
Examples of pieces under judging -
my Halloween Sampler is on the right!

And then it was time to go home.  I really had hoped there would be more time after the banquet to peruse the art in the display room and figure out who had done what!  But the art was removed quickly ... I was not ready to go!  But the conference was over, and planning for next year has begun!

All in all, it was a great event, and I'm trying to see how I can fit another May trip (this time to Tampa) in my travel schedule for May 2017.

Image credits - All pictures taken by me at the NAGQ 2106 conference.

Monday, August 15, 2016

Halloween Sampler - Projects #4 and #5

I had said last year that I'd get all the instructions for my Halloween Sampler posted by Halloween.  Well, that didn't actually happen - and I just realized that Halloween 2016 is fast approaching!  So at the least, I will get them up by *this* Halloween!

So here is the next installment of the Halloween Sampler Instructions!  This covers projects 4 and 5 (out of nine).  I've already posted the general instructions, the mat board cutting instructions, as well as project #1 and a bonus project!


First post -  Halloween Sampler
Second post - General Instructions and Mat board
Third post - Bonus Project and Project #1
Fourth post - Projects #2 and #3

And remember, if you want to download all the instructions right now in one go, then head over to Craftsy where I have them posted for $3.99.

Project #4:  Lonely Tombstone

Materials:
- grey, 6 strips at 10” long (stone center)
- dark grey, 4 strips at 10” long  (base)
- dark grey, 5 strips at 6” (stone bevel)
- grey, one strip at 30” long (stone top)
- black, 2 strips at 2” long (R and P)
- black, 2 strips at 1.5” long (R and P)
- black, 4 strips at 1.5” long (R and I)

Start by making squares out of all the 10” strips.  Glue the four dark grey squares into a line.  Glue the six grey squares together to form a 2x3 box.  Glue the grey box in the center of the line of dark grey squares, as shown.  (You may notice that all my light grey squares are not quite the same size.  If this happens to you, use the slightly smaller squares higher up on the tombstone, and put the larger ones lower down, glued to the dark grey base.)

Now make squares out of all five of the 6” strips of dark grey, and glue these into a line.  Glue this line on top of the grey box.  Using 30" of light grey paper, create a half circle, and glue this onto the small, dark 
grey squares to form the top of the tombstone.  You might not need the full 30” of paper.  I wanted a very dense top to the tombstone.

The RIP is formed using black strips.  Make a circle out of a 2" strip, and squash it into a line.  Do this with a 1.5" strip as well.  Make a circle out of a 1.5" strip, and slightly flatten it on one side.  Glue these three pieces together as shown to form the “R”.  The “I” is made from three, 1.5" strips, formed into circles and squashed flat.  The “P” is the same as the “R”, without the extra 1.5" piece.  Glue the letters onto the middle of the tombstone.

This forms the central project in the sampler.  Glue it into the center square.

Project #5:  Scary Owl

Materials
- black, 2 strips at 6” long (pupils)
- honey gold, 2 strips at 6” (irises)
- white, 2 strips at 9” (whites of eyes)
- black, 2 strips at 2.5” (outer eye)
- white, 1 strip at 25” (body)
- dark brown, 1 strip at 10” (body)
- dark brown, 1 strip at 4” (forehead)
- dark brown, 2 strips at 6” (eyebrows)
- dark gold, 2 strips at 4” (feet)
- dark brown, 2 strips at 10” (wings)

For the eyes, start by gluing the following in order, end to end:  6" black, 6" honey gold, 9" white, and 2.5" black.  Make two, and create tight rolls with them.  Start rolling from the longer black end (this is the pupil,) and then continue rolling the honey gold (iris) etc.

For the body, take a 25" strand of white and create a circle.  If you like, you can offset the center as I have, or leave it 'natural'.  Surround with 10" of dark brown.  Form into a slight oval shape.  Glue the eyes to the body. 

Now create a dark brown, long triangle to fill in the 'forehead' of the owl.  Use a 4" strip of dark brown.  Use two more dark brown strips 6" in a wavy leaf shape to make 'eyebrows.'   Glue together.

The feet are made of two dark gold strips, 4" long, made into curved teardrops.  The wings are dark brown, 10" long.  You can make these into curved teardrops, as shown here, or semi-circles.  You can keep them close to the body, as I have done, or angle them outwards so the owl appears to be flying.  Glue as shown.

Finally, use a 4" strip of honey gold in the form of a diamond to make the beak. Glue the beak on top of the 'face' just a bit between and below the eyes, as shown.

In the sampler, the owl is in the center of the top row.  Glue the owl into this square.

Image Credit:  All my own pix of my own quilling, my original designs.