
I particularly hope you have fun with the projects that are a little more unusual - there are lots of patterns for pumpkins, but vampire fangs and skeleton keys are a little more hard to find.
This post covers projects #8 and #9 (out of nine). I've already posted the general instructions, the mat board cutting instructions, as well as projects #1 - #7 and a bonus project!
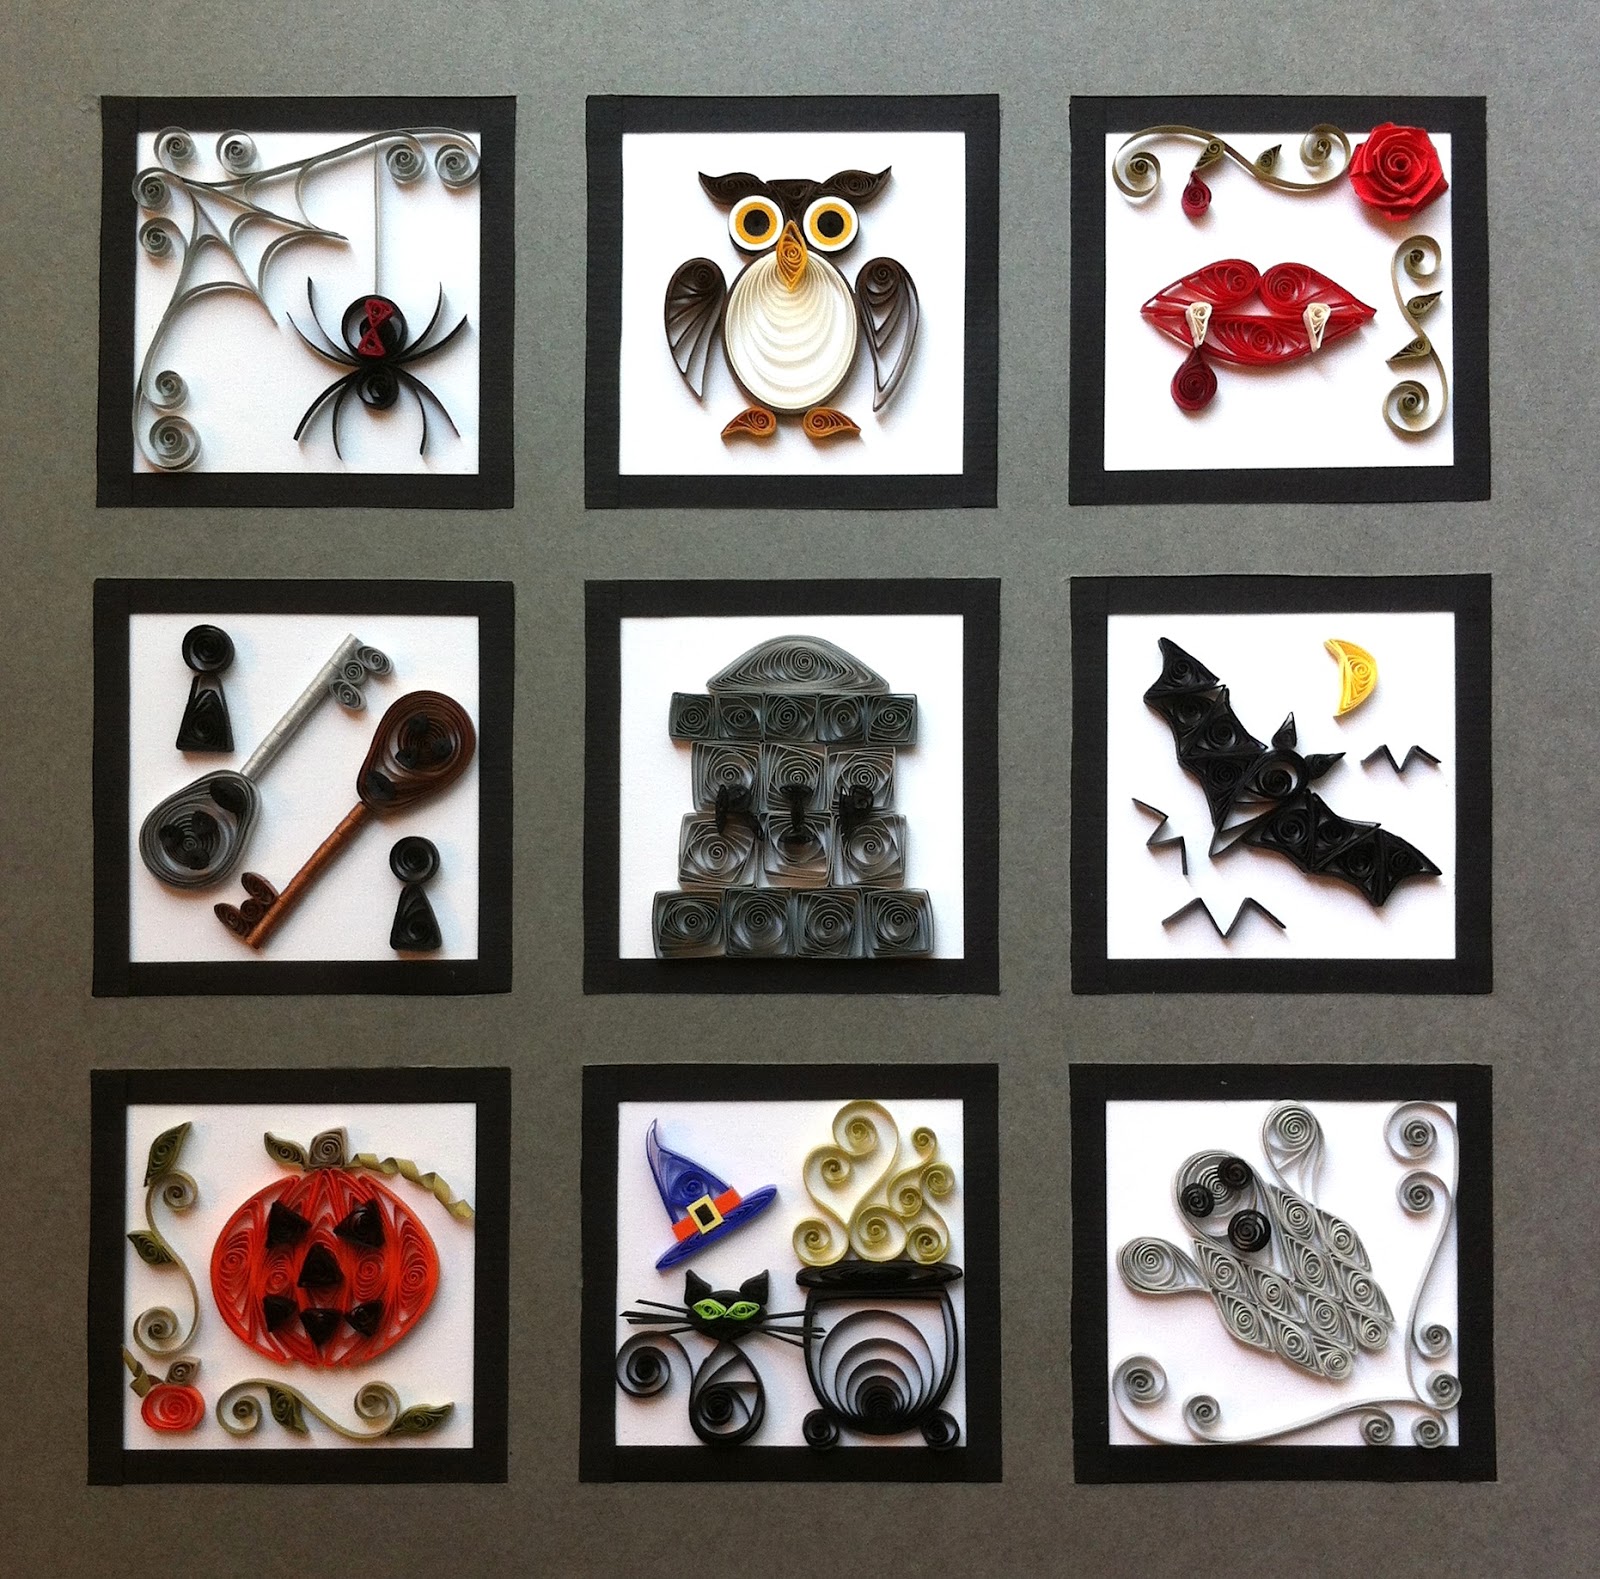
First post - Halloween Sampler
Second post - General Instructions and Mat board
Third post - Bonus Project and Project #1
Fourth post - Projects #2 and #3
Fifth post - Projects #4 and #5
Sixth post - Projects #6 and #7
Seventh (and last) post is this one! - Projects #8 and #9
And remember, if you want to download all the instructions right now in one go, then head over to Craftsy where I have them posted for $3.99.

Mouth
- bright red, 2 strips at 8” (upper lip)
- bright red, 1 strip at 12” (lower lip)
- bright white, 2 strips at 3” (fangs)
- dark red, 1 strip at 6” (blood drop)
Thorny Rose Vines
- bright red, 1 strip at 12” (rose) 1/4” wide strip
- olive green, 2 strips at 5” (vines)
- olive green, 4 strips at 2.5” (thorns)
- dark red, 1 strip at 3” (blood drop)
Start by using 2 of the 8" bright red strips. Make two long teardrops. Make a long, flat semi-circle with the 12" strip. Glue these three pieces together as shown to form lips. Form fangs by taking the 2, 3” strips of white and making long triangles. Glue these on top of the lower lip. Make a teardrop out of the 6” dark red strip, and glue it to the lower lip so it appears to be dripping off of one of the fangs.

 Make a rose from the 12” strip of 1/4" wide paper. Make two long “S” coil shapes from the 5” olive green strips. On each of these “S” shapes, glue two thorns. The thorns are long triangle shapes made from the 2.5” long strips of olive green. For a final touch, create a small teardrop shape from the 3” dark red strip and position it so it drips from one of the thorns.
The fangs and thorny vines are found in the upper right square of the sampler. Glue the pieces into place there, the square in the top, right column.
Project #9: Witch’s Lair
Materials:
 Hat
Hat- bright purple, 2 strips at 10” (hat)
- orange, 1 strip at 1.5” (sash)
- yellow, 1 strip at 1” (buckle) ¼ wide paper
- black, 1 strip at 1/8” (buckle)
Cat
- black, 1 strip at 9” (body)
- black, 1 strip at 5” (head)
- black, 1 strip at 4” (tail)
- black, 1 strip at 2” (whiskers)
- black, 1 strip at 2” (nose) 1/8” narrow paper
- black, 2 strips at 2” (ears)
- neon green, 2 strips at 1.5” (eyes)
Caldron
- black, 1 strip at 25” (pot)
- black, 1 strip at 12” (lip of pot)
- black, 2 strips at 3” (feet of pot)
- green/yellow, 4 strips; 5”, 4”, 3”, 2” (poison fumes)
To make the witch’s hat, start with a 10” strip of bright purple and form it into a long triangle, with the tip slightly bent. Make a circle out of the other 10” strip and squash it flat to form the brim of the hat. Glue together.
Use the strip of orange and wrap it around the bottom of the hat just above the brim. It should go across the front and down both sides of the hat (but not around the back). Trim the strip to fit if necessary.
 To make the buckle use the bit of 1” yellow wide width paper, cut a small rectangle. Use the black paper to cut an even smaller rectangle, as shown. Glue the black rectangle onto the yellow one. Now glue this onto the hat, on top of the strip of orange. (You can also make a nice hat from other colors, such as black and dark green, and use strips of different colors as well for the sash.)
The cat’s body is made from a wide teardrop formed from the 9” long strip of black paper. The 5” strip should be formed into an eye shape and glued on top of the teardrop. Use the 4” length of black to form a tail, curving and trimming into whatever shape pleases you. Make two ears by making long triangles from the 2” strips of black paper. An image of the back of the finished cat is shown.
 The face is more detailed, and getting a good picture was hard. First, make two eye shapes from the neon green, and glue them to the upper part of the head, just under the ears. Now take the 2” strip of black and use the scissors to cut it lengthwise into 4 very narrow strips. Center these under the cat’s eyes, and fan them out a bit to look like whiskers. Glue into place one at a time, right on top of one another. Just use one tiny dab of glue at a time, and then put another whisker down, and glue that. On top of the center of the whiskers, you will put the nose. The nose is a triangle made from the 2” strip of narrow black (although regular width would work fine, using narrow width paper here helps to keep the nose from poking out, and hides the middle of the pile of whiskers where you glued them in place.) Glue the nose. Trim the whiskers to be the right length for your project. (mine stick out about ½ to ¼ of an inch from the nose on either side).
 The boiling caldron starts with the 25” strip of black, rolled into an offset-circle. Put the center of the offset at the bottom, and flatten the top of the circle to be the top of the pot. Use the 12” strip to form a circle, and squash it flat to make up the brim of the pot. Glue in place. The feet of the pot are made from the 2, 3” strips made into circles. Glue to the pot.
The poisonous fumes are made from four pieces of yellow/green paper of various lengths. Each is made into an “S” Shape and glued to the top of the pot, and to each other wherever they touch. I used 5”, 4”, 3”, and 2” length strips.
Arrange the hat, cat, and caldron in the lower, middle square. Glue into place in the middle column, bottom, as shown.
Image Credit: All my own pictures of my own quilling, all my own original designs.


