Friday, September 16, 2016

Quilling the Moon: Highlands and Maria

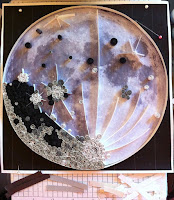
Moon - over half completed!
Highlands regions carefully
constructed to be filled in
later with 'mare' material.
As I mentioned in my first "Quilling the Moon" post, the highlands are the bright, mountainous areas of the Moon, while the mare regions (maria, plural) are the dark, flat, volcanic plains of the Moon.  I also mentioned along the way that since the mare were being filled in with nearly black paper, I needed daylight to do that work.  So I ended up working nights on the light highlands and leaving holes behind to be filled up with dark paper during the day.  It was an interesting way to approach the project, since I had to be constantly planning several steps ahead as to how the regions would look once they were completed.

Moon - Maria filled in!
Again, the color choice was really critical, and took a great deal of time.  I wanted to be sure the smaller, bright craters were consistently marked with the bright white paper, and that the intermediate areas were marked with the darker grey, leaving the bone white for the overall highlands material.  Creating the mare boundaries was also a challenge because I needed to ensure that the quills fit together nicely, with the sizes varying in a pleasing random sort of way.

Close-up of filled maria.
Going back and filling in the mare was very gratifying, since it made me feel like I was making a ton of progress.  But this was where the sizes of the quills really made a big difference.  Being constrained by the small areas, I had to be very careful and clever about how each quill fit next to its neighbor.  Some of the quills in this project are made from paper less than 1/4" in length, and so were pretty challenging to make and to fit into the tiny spaces they needed to occupy.  I remember doing work like this is a child, and the 'smallness' of the quills not being nearly so difficult for both fingers and eyes!

Image Credits:  My pix of my own quilling, my design!

Sunday, September 11, 2016

Quilling the Moon: Progress in the South

Some progress!
Even more progress!
As of this moment, I've finally completed my Moon, but I want to post some of the intermediate pictures to show the progress.  So I'll be finishing up the Moon blogging in another post or so.  But for now, compare the two images here and you can see how the edge of the Procellarum basin expanded towards the center of the image, and how the highlands were filled in from the right.

The mare sections at the top and left of Copernicus crater were really challenging.  As I approached the bottom of the Imbrium basin, I got more and more nervous about exactly how the basins would 'express' themselves.  I wanted them to be bold and easily recognized, but didn't want to lose the subtlety of the interesting margins, and of the craters and their ejecta.  So I moved very carefully, filling in the area to ensure that the basin would have an obvious round edge to it, but also ensuring that all the important tiny features could still be seen.

Close up of the area around
Copernicus.
Looking at the close up image makes this all seem so straightforward and easy!  But since every single quill was created on the fly - size, color, and placement - it was really very difficult.  But I do like the general effect.  It is certainly the Moon, and it has a strong mosaic look without losing the lacy feel that quilling offers.

What I'm starting to worry about now is how to hide the errors I'm spotting.  Like how my Moon is not a perfect circle anymore.  Pressure from the different areas as I glued them in place slowly altered the nature of the outline - it isn't quite a perfect circle.  I can see flatter areas, and areas with slight bulges.  Not sure how to hide this - I was already planning to put mat board around the outline, so perhaps this will make the project look more even.

Image Credits - My pix of my own quilling, my design!

Friday, September 2, 2016

Quilling the Moon: The Edge of Procellarum and Some Lessons

The first portion is filled in.
Here's some progress on my quilled Moon!  I filled in the areas of the highlands and the edge of the mare on the south eastern portion of the Moon.  Many lessons were learned during this initial phase of the project, and I'm sure I'll be going back to this section when it is all finished, and thinking, oh yeah, could have done that bit better.  But there is always room for improvement on any project, and if you wait for perfection, you get nothing!

Color choice - very tricky.
One lesson I learned is that I need better quilling lighting.  Working with dark paper in anything less than bright light is a chore.  It is too hard to see if the quills are nicely coiled, and to determine the perfect sizes to fit together in the mare regions.  So the lesson was twofold - buy a lamp, and also, only work on the mare regions during the daytime!  Another lesson, one I knew but had to have reinforced, was use the tiniest amounts of glue possible.  It really shows up in the dark regions, and I had to take out and redo some sections just to eliminate small glue spots I couldn't get rid of with my tweezers. 

I had no idea that only working with four colors could make color choice so difficult.  But it is.  Each and every one of these quills is an agony of choice.  The regions at the edge of bright/dark regions are particularly challenging.  How and at what point does the gradation start?  Some of the margins were easy, since they were very 'digital' - one side bright and the other dark.  But the messy grey regions ... very challenging.  I spent a lot of time making decisions between what met my artistic vision, and what was the most scientifically accurate.

One of the greatest challenges was the quilling around Copernicus crater, the larger bright crater on the right side of this image.  But I'll talk more about that next time!

Image Credits:  My pix of my own quilling!